Does your Valentine need directions? I have not been getting very crafty lately but when, Lisa, a reader commented on my Valentine’s Twig Heart Trivet, she mentioned a crafty project that she has made in the past, and there I was, feeling inspired to craft something for Valentine’s Day. Something to point a Valentine in the right direction!!
I’ve dyed toothpicks with red food coloring when I made the Valentine’s candle wraps, so this time I wanted to go bigger, as in pallet wood slats and perhaps a trail sign with clever Valentine’s Day expressions. Oh, I think I’m soooo creative, don’t I?

Valentine’s Day Trail Sign
This Valentine’s Day Trail sign might help or confuse your Valentine, but could it be any cuter?!!
I sent a pic of this to my son while we were Skyping. He said, “Ma, this is the kind of cheesy thing I see on the web and roll my eyes at…but, yes it’s cute…in a girly kind of way…”
My husband just looked at it and said, “ooohh jeeeeze!”

I started with 3 pallet wood slats
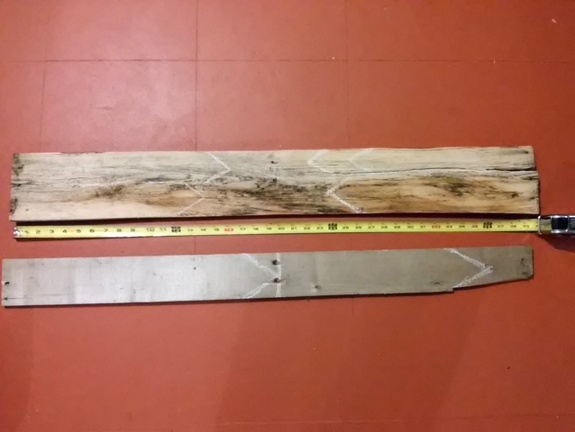
I used a measuring tape and chalk to draw some trail sign arrows on 2 of the slats.
Ken cut these out for me with his table saw, but a hand saw would work too.
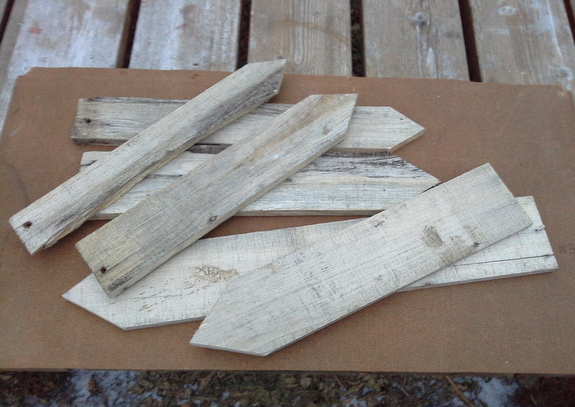
I sanded the arrows with my power hand sander.

Next I mixed 1/4 cup hot water, 2 tablespoons vinegar and about 15 drops of red food coloring into a glass jar, and then applied the dye mixture to the wood slats in 2 coats and let the slats dry.
I also painted the 3rd slat with white paint, let that dry, and then ran the power sander over the white paint to get a weathered look.
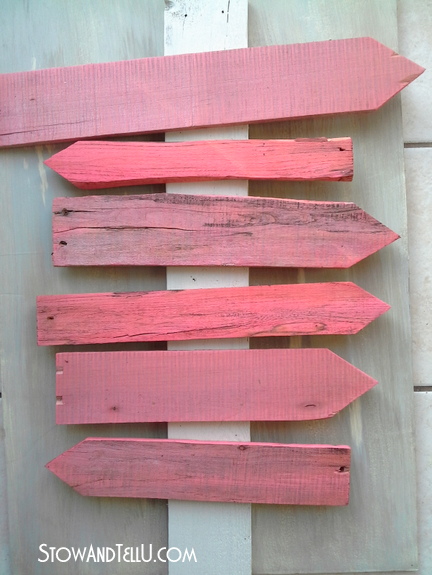
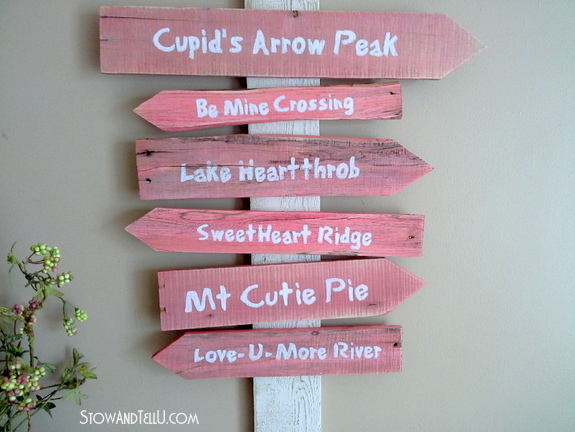
I laid out the slats onto the painted white piece with a trail sign arrangement in mind.
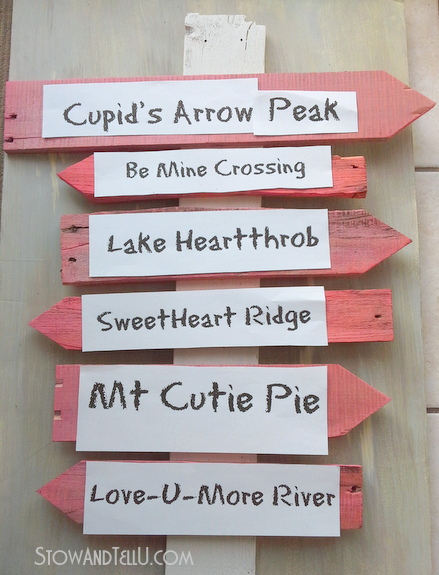
I made some catchy Valentine-trail sign saying using PicMonkey in the Eraser Dust font.
You can follow these steps to make the wording:
Go to: PicMoneky
Click: Design
Click: Custom
Adjust size to: 2000 x 1400
Resize to: 1001 x 701
From that point: start adding text as if you are writing it onto
an 8-1/2 x 11 piece of paper in the landscape position.
Save to desktop
Print out as a full page
Tip: since the slats were about 11″ long, I printed my sayings to fit on a standard 8-1/2″ x 11″ piece of paper in the landscape format.
The top slat was slightly larger, so I made that layout a little bigger.
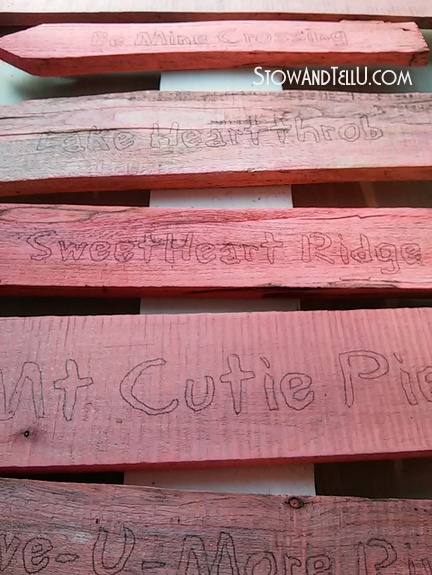
I cut out the sayings and laid them onto the slats, and then placed carbon paper underneath the paper and traced with a pencil.
I then used a white paint pen to trace over and then fill all the letters in with white paint. I went over the letters about 3 times, letting the paint dry in between.
I gave all the slats a quick sanding and then adhered them all to the painted white slat with construction adhesive. 2 holes were drilled for wire or twine so that it could be a hanging piece.
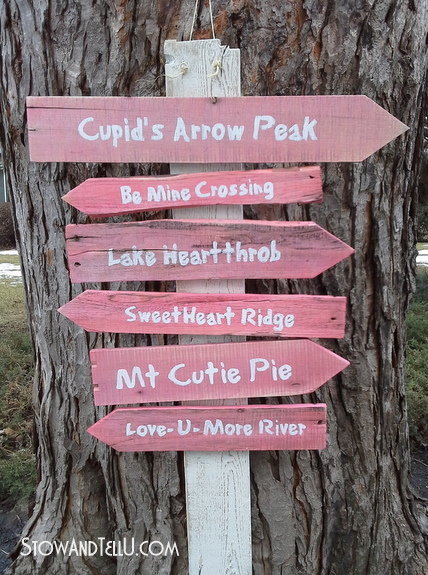

The way the wood slats turned pink from dying them with the red food coloring is probably my favorite part. The campy Valentine sayings just fit so perfectly, I couldn’t resist.
A smaller version could probably be made with wood shims and perhaps some stick-on letters.
You can see more Valentine ideas, here.
Thanks for the inspiration, Lisa!!
chris aka monkey says
this is so cute in a girly kinda way ha ha ya think love it xx
sharleen says
I LOVE this Amy, i tried to pin it to my pinterest. but its not working. I just saved to anyway. love it. well done.
sharleen says
I did manage to get it to pinterest after all.
Sherry says
So cute! And creative! I’m happy to hear my guys are not alone in their eye rolling and “what are you doing that for” comments.
That’s why we have our blog friends! Great job Amy!
Tuula @ The Thrifty Rebel says
That is totally adorable Amy. I think Mt Cutie Pie is my favourite, but all the names are great. So sweet.
Feral Turtle says
This is so freakin cute Amy! Love the pinkness of your arrows. I think hubby would get lost if I made one…hehe
Danni@SiloHillFarm says
In a girly kind of way….LOL! I totally love this Amy! You’ve given me my first project for my backyard this summer! I’m intrigued by the paint mix and am looking forward to trying that because my milk paint experience was a disaster and I love the way that mix looks on the pallet boards. Also…that is a great tutorial for the signs on picmonkey! Thank you again!
Bliss says
It’s awesome and I’m pinning it. Although my mind did go a different “direction” with the directions!
Tammy says
So cute…love your sign..thank you for sharing at Share it One More Tieme
Marie, The Interior Frugalista says
That is really cute! I’m pinning to share on my wedding board and to show my daughter who is getting married in August. Her wedding is outdoors and I’m thinking our own version of this would be perfect.
Amy says
That’s so exciting that your daughter is getting married! A summer wedding is my favorite kind. I’m glad this project gave you a little inspiration and I’m looking forward to seeing your version if you make some. Good luck and enjoy the wedding planning, Marie!!
Julie says
You can’t get any cuter!! Pinning to our Pinterst board and sharing on IG soon! XO
Amy says
Thanks so much for all the shares, for stopping by and for hosting the party Julie!!
Audra @ Renewed Projects says
Very cute idea! And excellent tutorial. Pinning.
Amy says
Thanks so much, Audra