Machine washing and drying burlap is not quite as simple as washing most other fabrics such as cotton, but it is possible. There is a little more to it with various expected or unexpected results. As I am starting another burlap project, I decided to give the machine washer/ dryer method a try despite my earlier argument not to on how to dye burlap. Being cooped up inside for winter, the idea of hand-washing all this burlap seemed daunting, so the curiosity got the best of me, and I did a search and found very useful tips from Ella Claire and Southern Abbey which gave me the assurance I needed to try the machine method. I recommending reading them both, as there is plenty of helpful burlap washing advice.
 The following are my results on machine washing burlap, machine drying burlap, hang drying burlap and a combination there of, as well as a list of tips from my findings at the bottom of this post.
Before I go any further, please note that the hand washing is probably still the most recommended method, and you can find these steps at on E-How.
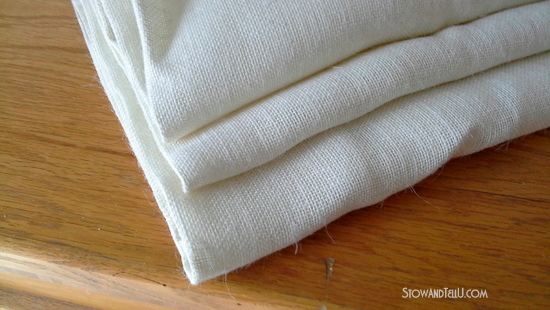 When you purchase burlap from the fabric store, it typically comes to you very stiff, unwrinkled and pungent smelling. You may be doing a project such as stretching it over a canvas to make artwork where washing and/or drying aren’t necessarily required, thus you need go no further.
 A softer, less smelly burlap is what many of us are looking for when were trying to make drapery, pillows, or upholster a bench.
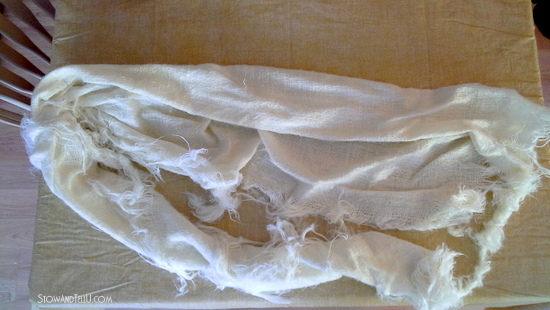 Out of the washing machine, after one washing, these are my results:
It was a bundle of tangled and mangled burlap pieces that led me to believe that I had ruined it all. The ends had unraveled a lot and had wrapped themselves around each other. I wasn’t about to give up just yet; but I did take note that I had pre-cut my pieces, and washed several pieces at once. This may have made matters worse. Washing one larger piece would probably have worked somewhat better, with less unraveling.
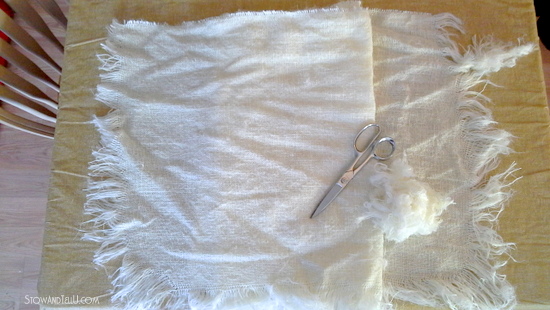
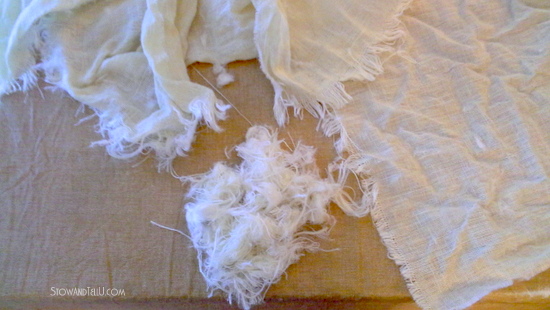 How I remedied the tangled mess:
I grabbed a pair of scissors and started cutting and untangling the burlap ends that had come unraveled and tangled. It wasn’t quite as bad as I thought, if you don’t count the cost of the waste.
Next, I tried several drying methods:
I put one piece in the machine dryer on medium heat until dry.
I draped some of the pieces over a drying rack.
I put another piece in the machine dryer on medium heat for about 10 minutes, and then removed and ironed dry the rest of the way
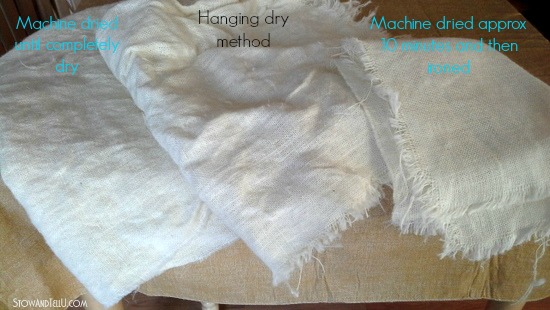 After drying several ways, these are my results:
The fully machine dried piece was the softest, with the least amount of large wrinkles and stiffness, but had done some shrinking (left).
The hung dry piece had the largest amount of wrinkles and still had some stiffness (center).
The partially machine dried and then ironed piece had the least amount of wrinkles and shrinkage but still had some of the stiffness (right).
Overall the pungent smell had diminished but was not fully gone.
NOTE of warning: I’ve seen comments on the web about the dangers of putting burlap in the dryer, but I have googled ” burlap dangers in the dryer” every which way I can, and I can’t find any warnings on the subject, other than comments made on a few sites. If you know of any dangers or have knowledge to share, please leave a comment, I welcome it.
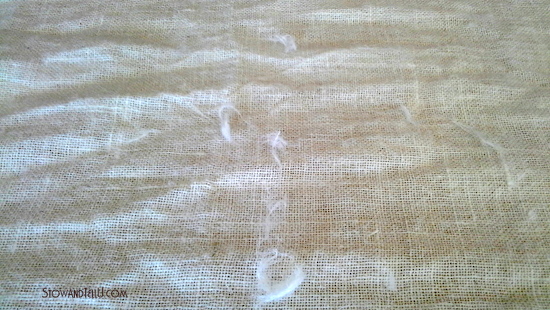 In addition there were loose-strand bunches stuck to the fabric, both before and after drying. If hanging dry, these can be shaken and brushed off later. If machine drying, a lot of the loose-strand bunches will come off, but not all. Bushing and shaking may still be required.
 After machine washing a 2nd time, these are my results:
Another bundle of tangles, but not quite as bad the 2nd time around, overall less waste.
 After machine drying a 2nd time, these are my results:
All of the pieces were even softer.
There were less bunches of lint, although it still had the singular stray strands a-plenty.
The fabric texture had a slight poof-y kind of wrinkle, rather than large, unmanageable wrinkles.
The smell, though still there, was even less.
I still had to take it all outside and shake of the lint bunches that were remaining.
The burlap ends had all taken on a soft fringy look. I kinda liked it!!
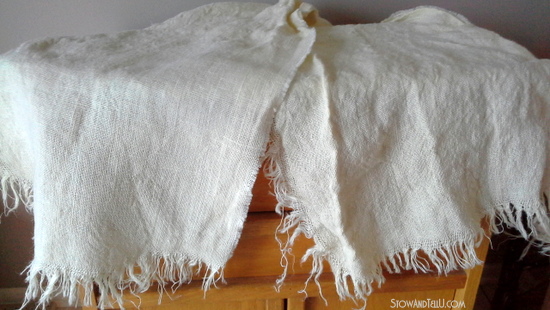 After ironing, these are my results:
After washing and drying two times, I ironed the pieces with quite good results. I used a spray bottle with distilled water and put my setting on linen. Iron settings can vary. I tested mine at the lowest heat first and move up to the linen setting from there. (Left piece has been ironed/ right piece has not been ironed)

 Tips for machine washing/drying burlap:

- Don’t pre-cut pieces; wash and several yards at a time; cut pieces afterward
- Keep a pair of scissors handy for cutting frayed and unraveled ends
- Use half the amount of soap when washing
- Consider other additives, such as bleach or vinegar, or fabric softener
- Don’t add fabric softener if you plan to paint or dye fabric afterwards
- Wash and/or dry as many as 3-5 times to obtain the softest fabric results with the least amount of smell.
- Results may vary between front load machines and top load machines
- Consider using a laundry mat, rather than your own machines
- Clean out your washer with a damp cloth afterwards
- Clean out all of your machine dryer lint traps and ducts afterwards
- Consider hand washing and hang drying if you are in any way uncomfortable with the machine method
- Consider serging or stitching the edges before washing (you can find details from Pam in the comments below)
- If you want to wash coffee bean or potato sacks, try this method
- All results may vary
- Expect the unexpected
- READ COMMENTS BELOW for additional tips on sewing or stitching the fabric before washing, washing colored burlap and waterproofing burlap.
Machine washing and drying burlap is possible. There are certainly arguments against it; so this method is not for everyone, but I did find it convenient, a time saver and I will be doing it again.
Thank you for stopping by ~ Amy
Doreen@househoneys says
This is really very valuable information Amy. I know it must have taken a lot of time to put this post together. I’m pinning!
Danni@SiloHillFarm says
I had no idea you could even wash burlap, let alone dry it. I’m looking forward to seeing what you do with it now.
Feral Turtle says
This is a great post. I would have never even considered washing burlap. Maybe those upholstery projects that I’ve seen aren’t such a bad idea after all!
Bliss says
Burlap coffee sacks make the same mess in the washing machine. I know from experience and I won’t make that mistake twice!
Liz says
Hi Bliss, I’m looking for a way to wash coffee sacks. Can you tell me how you did it? Mine are already painted, did the paint come off? Thanks in advance!
Amy says
Hi Liz,
I wouldn’t put these the coffee sacks in the washing machine. My best suggestion would be to very gently and quickly hand wash these in cold water. I cannot be sure that the paint won’t come off or smear, so this is just a suggestion. Another option might be to take them to (or call) a dry cleaners and see if they might be able to clean them for you. I really hope this helps. Good luck ~ Amy
heather f says
I am all astonishment. HAHA do you like Pride and Prejudice? Anyway, I try and sneak in quotes from that show wherever I can. This is really kind of amazing. Great post and great info!
Mel says
They do look like a softer fabric after the wash, why wouldn’t burlap go in the drier its not synthestic fabric apart from shrinkage it should be fine
Edythe says
Just wondering, if you machine sewed a basting around the fraying edges before washing in washing machine would it hurt anything? Could/would it help lessen fraying? Or would be a problem with the shrinkage? I wonder if after you dried and washed a few times, then you could cut in desired pieces.
Just wondering and thinking out loud. Considering making curtains with burlap and looking for helpful hints. You have done a lot of work and I am grateful of all your work already. Thanks Edythe
Amy says
Edythe, I think you could definitely stitch your edges, and wash/ dry a larger piece to cut into smaller pieces afterwards. If you put it in the dryer, you will have some issues with shrinkage. Here is a tutorial on making burlap curtains that might help: http://chickenscratchny.com/2013/01/burlap-curtains.html. Here is a tut on stitching your burlap before putting it through the washer and dryer: http://www.thebarefootseamstress.com/2011/10/working-with-burlap.html. I hope these help. Good luck ~ Amy
Pam says
Thanks for the great post! I hate the jute odor of burlap and I really hate the fuzz…it affects me almost like wool does, so when I decided to do burlap panels I was really concerned about both. Your post encouraged me to wash the fabric…but I was really worried about how much shrinkage to expect. I couldn’t find anything anywhere on the net so now that I have successfully washed, dried, and ironed mine I want to share my experience.
First I serged both cut edges of my 10 yard length of Hancock’s Fabrics 3.99 on sale burlap…actually I bought 10 yards and 12 inches hoping that would cover the shrinkage. I used 1 full scoop of surf powdered detergent and about a quarter to a half box of baking soda (I just dumped a gob in) in a delicate wash cycle using cold water and the extra rinse cycle. I also added a full capful of snuggle fabric softener to the dispenser.
Immediately after the wash was done, I unwound the wad of burlap, roughly shook it out and put it in my dryer on the regular heat cycle. Since it was so much fabric, I ran it about 30 minutes, but every 5-10 minutes I cleaned the lint trap and rearranged the burlap so it could evenly dry. I spent about an hour ironing it (!) and measured it to be about 10 yards 6 inches. The width was exactly the same.
Here are my observations: my burlap did not fray AT ALL. Maybe it was the serging? Maybe it was the delicate cycle? Maybe I bought awesome burlap (not). I didn’t have THAT much fuzz…after reading the other posts here and online I was prepared for a total mess…don’t get me wrong, it was messy, but not on a grand scale. I had NO ODOR when I was finished…yaaaayyyy! The burlap held its color and was much softer, yet still had some body. And shockingly, as noted above, there was very minimal shrinkage. This may have been due to the fact I didn’t dry it completely and the ironing stretched it back out.
So there you have it…finish your cut edges, wash in cold water, don’t dry your burlap all the way and iron it out and you will experience VERY LITTLE SHRINKAGE
Amy says
Pam,
Thank you SO MUCH for sharing your findings, here, after washing and drying your burlap!!! I’m so glad you took a chance and did it because it sounds like it worked out perfectly for you. I cannot agree more that I think the key to great success with this is that you SERGED THE BURLAP ENDS FIRST.
I think that is awesome that you didn’t have any shrinkage and I realize now that the shrinkage I was getting was really unraveling. It also sounds like the serging helped keep the fuzz to a minimum.
Thank you again for taking the time to post this comment about your success!!
Sincerely,
Amy
Janice says
Hi Amy,
I really enjoyed the way you presented the results of your burlap experiments, very informative post. After looking at several sites on the subject, I believe yours is far the best.
I just purchased 10 yards of burlap, with the plan of making curtains so extra thanks for the link on making curtains.
Amy says
Janice,
I’m so excited for you that you are making burlap curtains, I love a good burlap project! I’m so glad that this post was helpful to you, as well as the link for the curtain tutorial. Thank you so much for taking the time to leave such a nice comment and good luck on your curtains. I’d love to hear how they turned out.
Kerstin says
I bought some dark pink burlap yesterday. Wondering if anybody tried to
was “coloured” burlap yet and how the results were? Anybody would have
a suggestion how I can avoid bleeding when the burlap would get wet?
(as I would like to fashion up some of my older clothes with this burlap)
Amy says
Hi Kerstin,
I haven’t tried washing colored burlap. I would think there would be some bleeding when washing. I would suggest washing in cool or luke warm water and then line dry to get some of the stiffness and or smell out.
As far as a product that might protect the fabric from bleeding, read this article for water repellent ideas. This blogger used in on her burlap upholstery. Apparently people use it on outdoor clothing gear, as well, so it might work for burlap clothing, too.
http://rainonatinroof.com/2014/05/waterproof-repel-stains-fabric/
If there is any way you can test a swatch of the fabric, I would recommend doing that.
Best of luck and let me know if you have any other questions.
Amy
Linda says
Amy I purchased some burlap by the yard (and looks more like potato sack due to a coarse weave). It has dark blue printing on it (Broncos) and I’m making a valance for my grandson’s bedroom. Do you think the printing will be safe if I wash in the washing machine and drying in the dryer? Thanks for all your advice here on this topic. Very helpful!
Amy says
Hi Linda,
Sounds like a fun project for your grandson. Here are a couple of ideas that I would suggest. 1) If you have a sample cutting. You could try washing that and see how the dye holds up. This would be the best way to test if the dye bleeds or fades. I notices with the coffee sacks I had, that there was only the slightest bit of fade when I hand washed them. Burlap is such that washing it will give you some fade or worn look, but it will also make the fabric softer especially for making curtains and such. 2) If you have a big bucket (one of those rectangular plastic storage bins works really good, too) You could hand wash the fabric, but then put it into the washing machine on the spin cycle to get most of the water out of it. Hand washing might be a little more gentle on the fabric as far as the dye goes. Machine drying will soften the fabric a little more than line drying. 3) Stitch (or serge) the ends of all of the fabric if you want to machine wash and machine dry. If you don’t do this, you could end up with a lot of unravel. 4) Check out my post: https://stowandtellu.com/how-to-wash-coffee-sacks/ I hand washed the coffee sacks twice and there was very little fading.
Please let me know if you have any other questions. Like a mentioned. If you could test a cutting, that will give you a better idea of how the dye will hold up with washing. Good luck and if you have a chance, let me know how it goes. Thanks so much, Amy
chrissy says
i am looking for fabric exactly like this burlap! but everything i see looks waaaay different. what is the weight of the burlap shown? is there a link to where i could get some?
Amy says
HI Chrissy,
Thanks for your question. I’m hoping I can help you. First, I can tell you that I’m pretty sure I purchased my the burlap used in this post from either JoAnn Fabrics, Hobby Lobby or Michaels.
I can tell you it was lighter in color, and it did have a tighter weave, probably making it close to a 10oz fabric weight. But most noticeably different about this burlap was that it was quite a bit lighter in color than your typical bean sack looking burlap.
The typical name is white burlap which you can find online (affiliate links) at Michaels: http://www.michaels.com/white-burlap/MD005335S.html
This one is 8.5 oz.
Also this one at Amazon: https://amzn.to/2GCjaJu
Which is 11oz and slightly tighter weave.
Check out this post: https://www.onlinefabricstore.net/makersmill/burlap-fabric/ it includes a video that explains more about the differences in weights, coatings and finishes.
I hope this helps you, but let me know if you have more questions. I’d be happy to help.
Thanks so much,
Amy