So I really like the look of mercury glass and all the super cool ways it is being used out there in crafty land; thus, I started a faux mercury glass project using Looking Glass paint. I found a tutorial, which I’m sure clearly states the correct way to apply the product and proceed to make it look like old mercury glass; however, I only viewed one tutorial and may have even got those steps wrong.
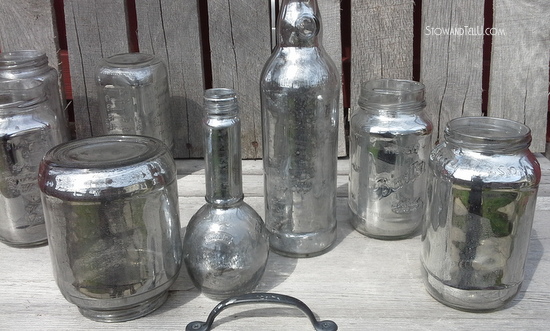 The directions I followed advised to paint the underside or opposite side that will show, and that is what I did. Here is how the bottles and jars currently look and so far. I think they look nice, but it just wasn’t exactly the look I was trying to get. These don’t seem agey looking enough to me, but it might just be me.
NOTE: all of the jars and bottles have been painted on the inside only
Helpful mercury glass info
After going back and reading through several more tutorials, such as this YouTube video from Vintage Fragment or this helpful mercury glass tutorial from 17Apart. I now realize that I could have also painted the outside or side that will show when the project is done.
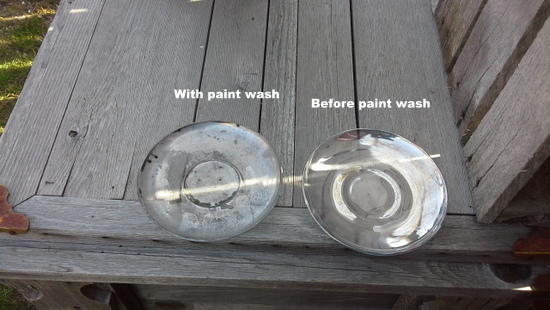 In what I like to think of as my infinite crafty wisdom (yeah, right!!) I decided to try getting a bit more of an aged look by coating the painted side with a brownish, grey paint wash.
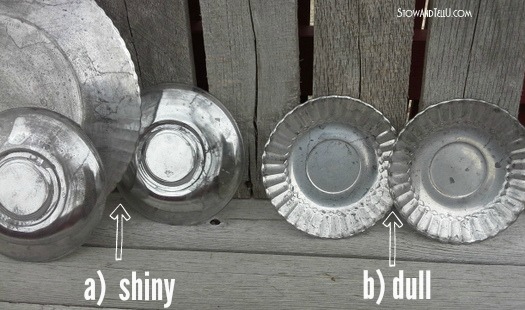
NOTE: all of the small plates have been painted on the up facing side. Please disregard the larger plate on the below-left, as the larger plates were painted on the back side. That is why that one does look dull.
 Once the paint wash dried, it ended up looking like the dishes on the right.
So I can leave them as is, painted on one side, with the shiny sides showing in the finished product, or I can paint the second side and add the aging technique, which would make the finished project look overall much older and dullish.
Here is where I need your help. Which look do you like?
A) Shiny (vintage-y but clean looking)
B) Dull (more aged and even a bit dirty looking)
NOTE: Option A is painted on the reverse side, or the side not showing. Option B is painted on the side showing.
I like both, really, and I think I have an idea about which one I’d rather do for the upcoming project. I would just love to get some more input before I proceed.
And of course I don’t have to do just A or B, maybe a combination of a few tricks, or perhaps someone has a suggestion ——–> Thank you for helping me out.
Hope you are having an awesome day ~ Amy
I still have a giveaway going on for a Mary Kay Lemon Parfait Pedicure Set if you want to take a chance.
Mel says
I like a better, the dirty look is why I don’t always like vintage or shabby chic.
Shanna Gilbert says
I like both but I think I like the shiny one better.
Feral Turtle says
I think I am partial to A too! It looks like the real thing!
heather f says
I think it depends on what you’re doing. If you are going all old west cowboy chic, then you’ve got to use B, but if you’re going classy English countryside, then you’ve got to use A.
Maggie says
I like the shiny one, Amy 🙂