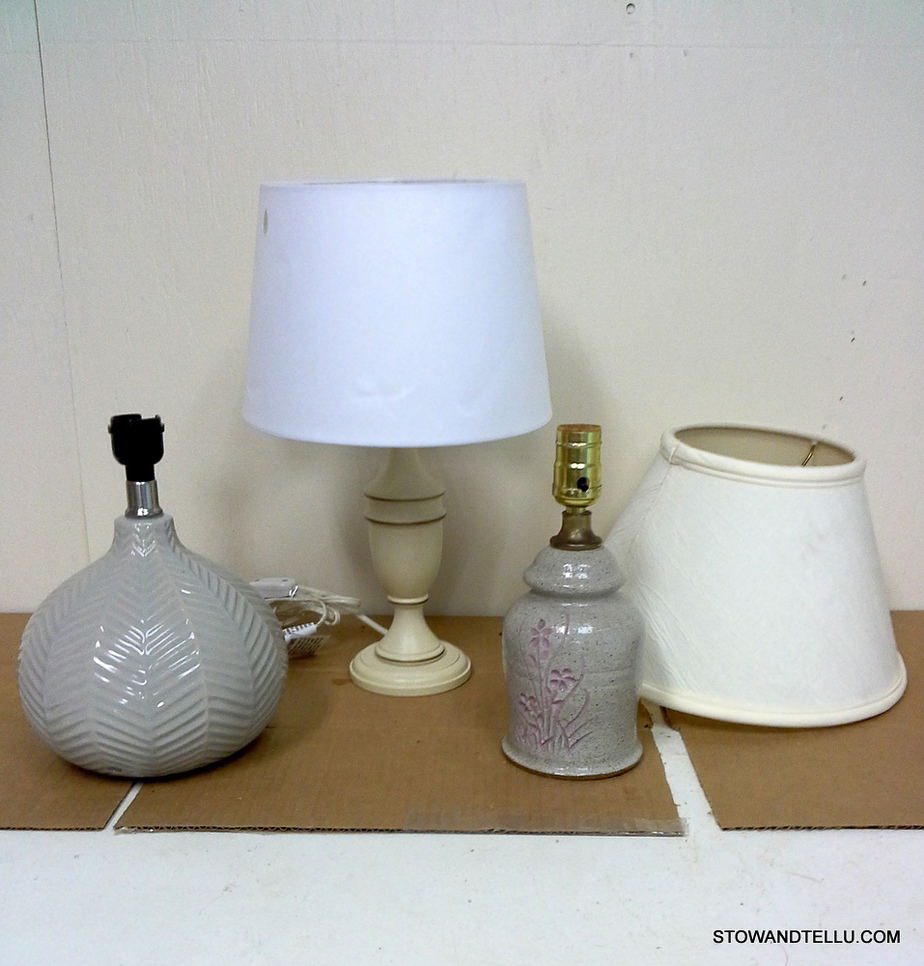
There is always an onslaught of lamps and lamp shades at the thrift store. I can never seem to “not” look, just to see if anything catches my eye. I love that lamps are useful. They light our way. That’s why I hate to see the jumble of lamp shades and light fixtures, slightly abused, no longer matching each other, and just plain sitting there waiting for someone to buy them before they head to the dump.
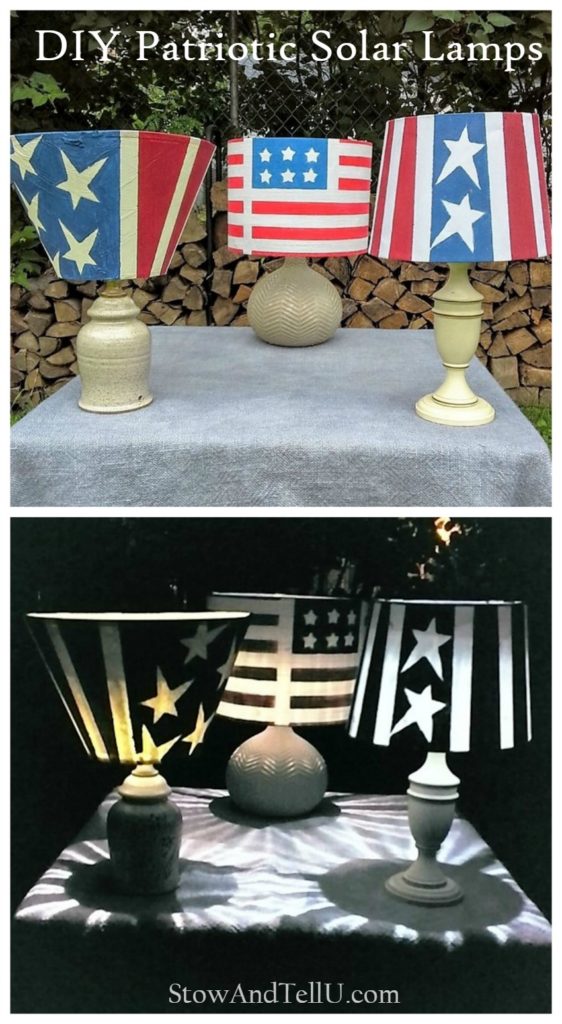
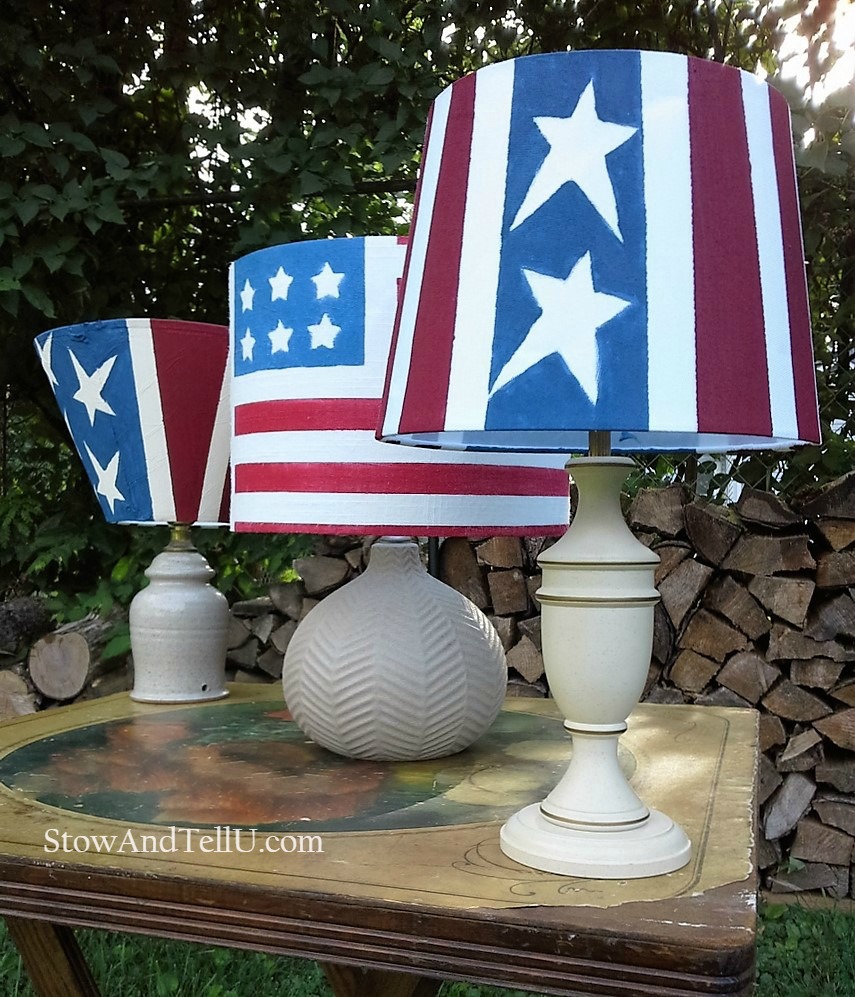
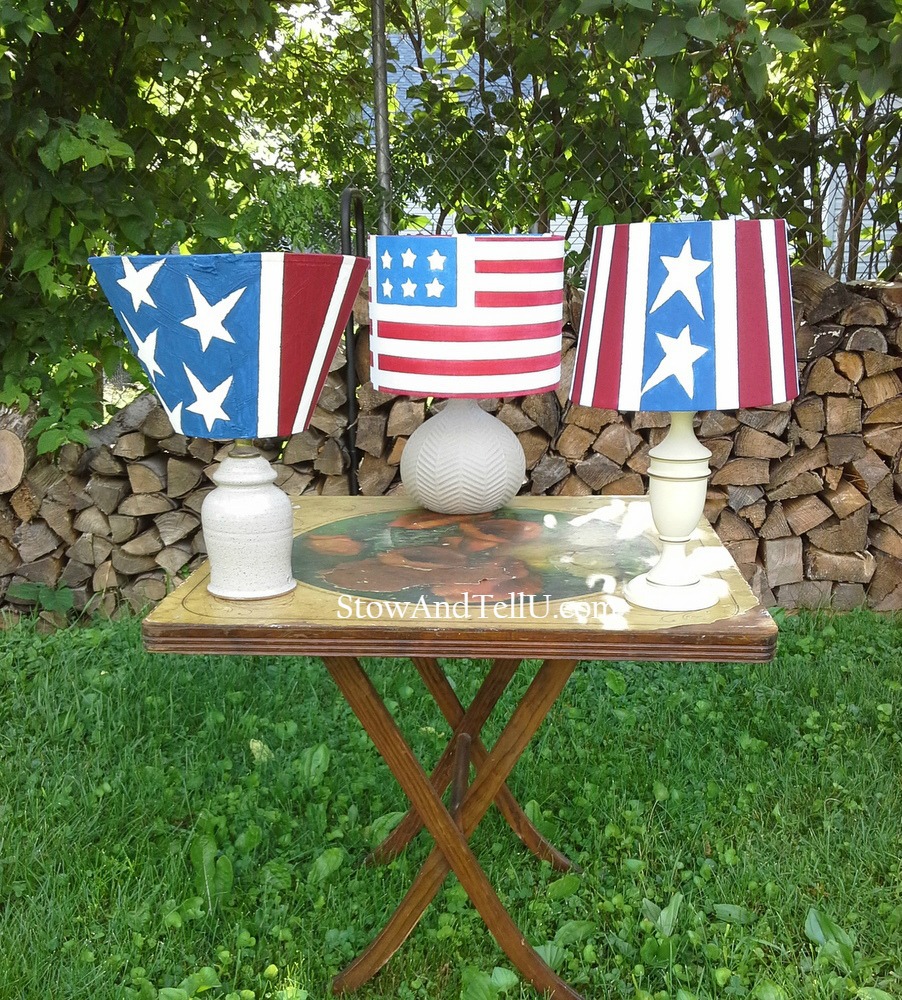
So I’ve gone stars, stripes and outdoors-y on a few lamps for this month’s junk revision challenge theme: patriotic.
Be sure to check out the rest of the challenge which is featured at the bottom of this post because you never know what patriotic ideas lurk behind your pile of junk, bwahahaha!! Oops, wrong holiday.
Anyway, I mimicked the stars and stripes of the USA flag for these solar lamps, but with a few adjustments other flags could be made in much the same way. A stencil of the flag symbol, a couple of straight lines or waves, you get the picture.
There are 2 ways that you can stencil the stars onto the lamp shade. I’m going to show you both, but I ended up preferring method #2.
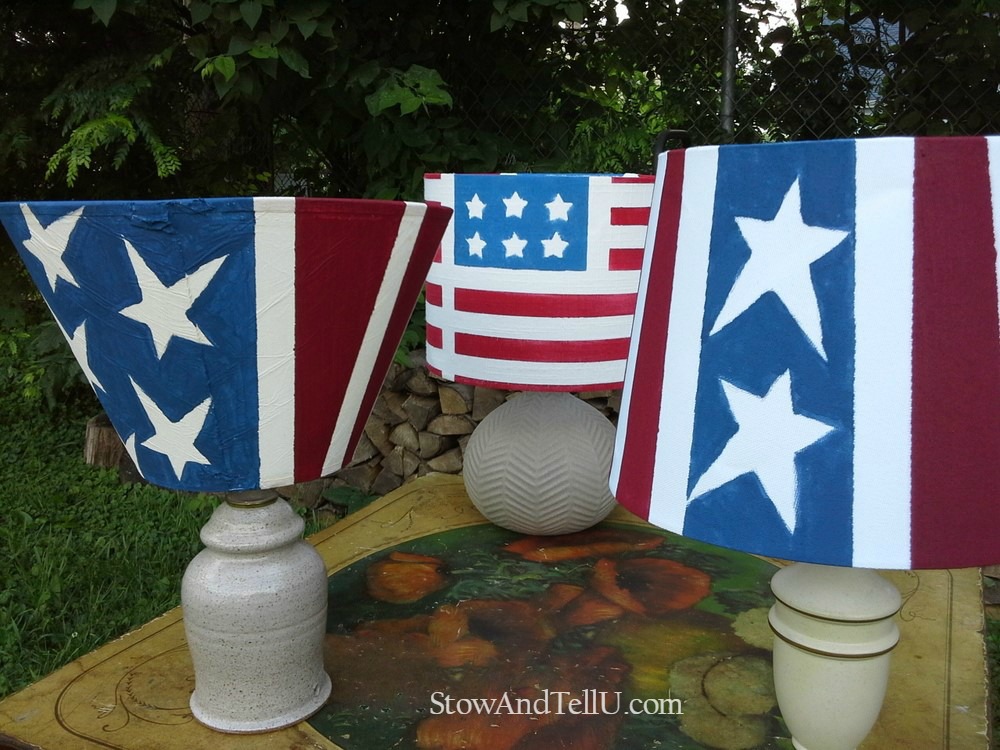
Do you notice some of the stains and crinkles in the lamp shades?
Supplies
Lamp base
Lamp shade – white or off-white – with socket frame
Wire cutters
Craft paint in red and blue (to make stars and stripes)
Stars – either foam stickers – or – a printable
Flat tipped thin craft paint brush
Pouncing sponger or small paint brush
Painters tape
Clear coat spray that works for the outdoors
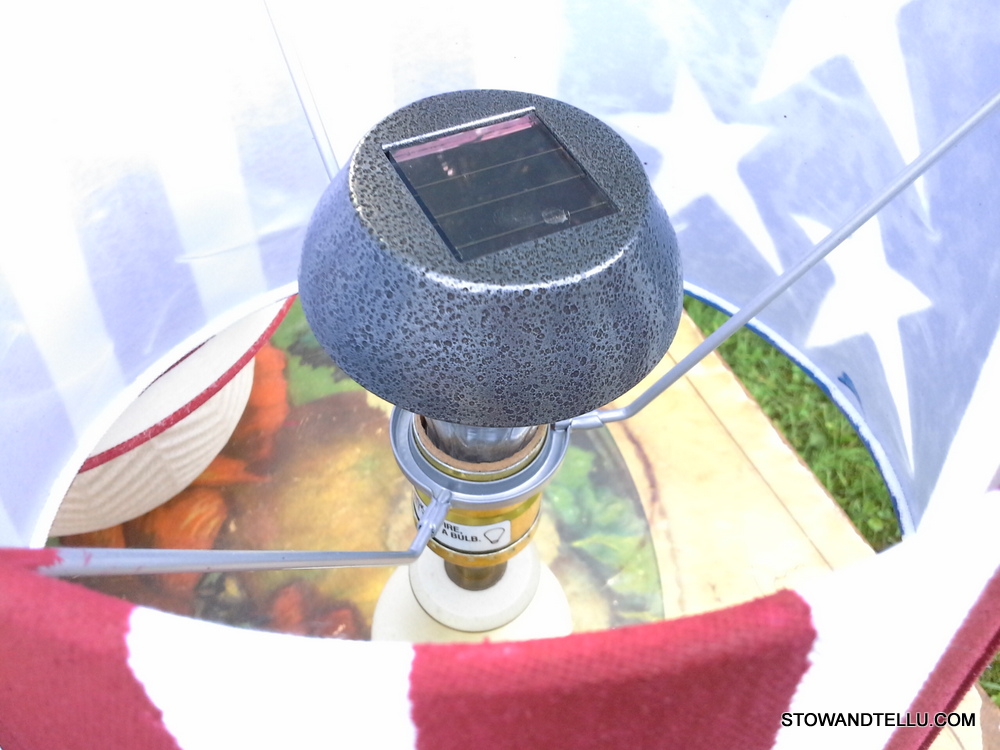
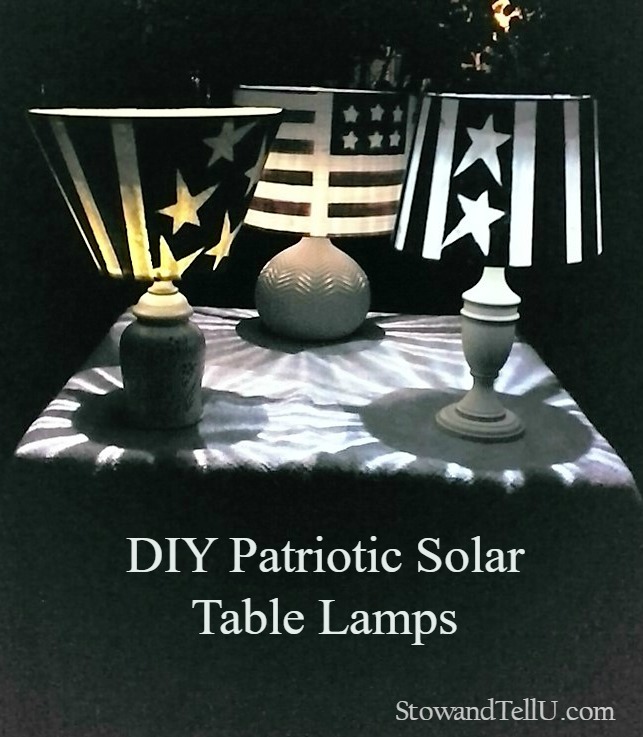
Solar lights (one for each lamp)
Step 1) Finding and prepping the lamp shade.
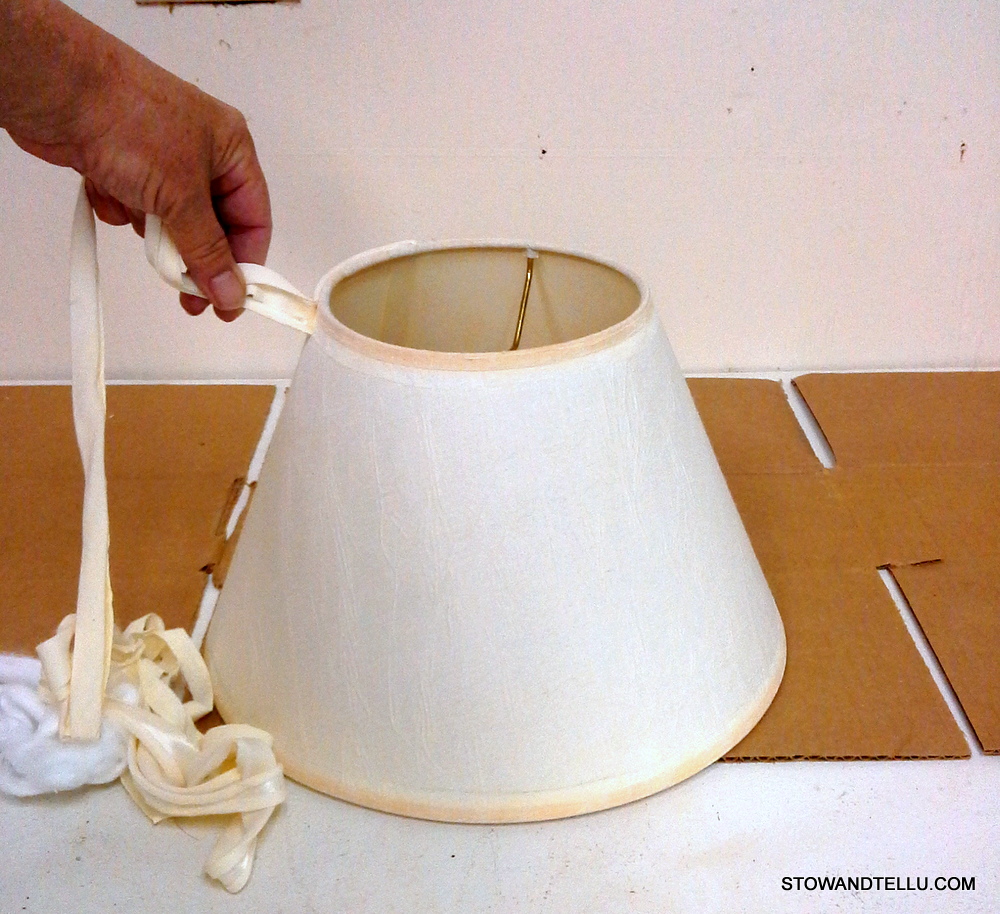
Try to find lamp shades that are white or off-white and as plain as possible. Also make sure they are the socket frame type
I had to remove some trim from one of them, which turned out to be a torchiere, so it had to go upside-down, as well. I gave this one a paint wash with white chalk paint to freshen it up.
I did not have to give the other two lamp shades a coat of white paint.
If there is a little yellowing on the shade, you can definitely use a primitive star pattern for that folk art look.
Note, even if the shade had a few stains, you can lay the design out so that the blue or red covers the stains.
Step 2) Making the stars and stripes pattern.
There are two ways to make the star pattern. I prefer method #2, but here are both:
Method #1 – Using foam star stickers.

I taped off sections for both the stars and the stripes, In the star section, I placed star foam stickers, and then used a pouncing brush to apply the blue craft paint.
Then I used a small paint brush to apply the red. Once done, I peeled off the star stickers and the tape and let dry.
Method #2 – Using a star printable.
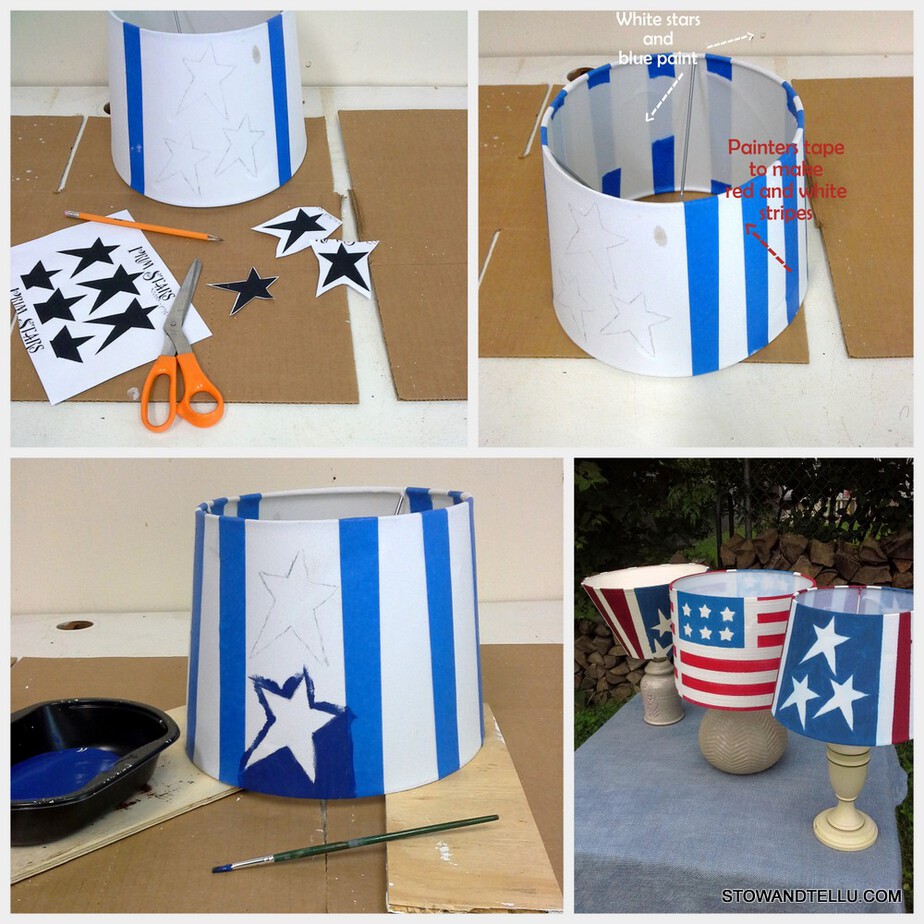
I found this Americana star printable from Worldartsme. I printed it as “2 on a page” to get the star size I wanted, and then I cut out one of the stars.
I taped off two sections on the lamp shade for stars with blue and taped off the rest to be red and white stripes.
I laid the paper star onto the lamp shade and traced with a pencil. I didn’t do this perfectly by any stretch of the imagination.
Using a flat tipped, thin craft brush, I traced out the stars with the blue paint, and then filled the rest in. Not shown here, but it helps to start in the center and work outwards.
Lastly, I painted the stripes red, allowing drying time between phases, then removed the tape.
I gave all of the shades an outdoor, matte clear coat spray.
Step 3) Turning a lamp into a solar lamp
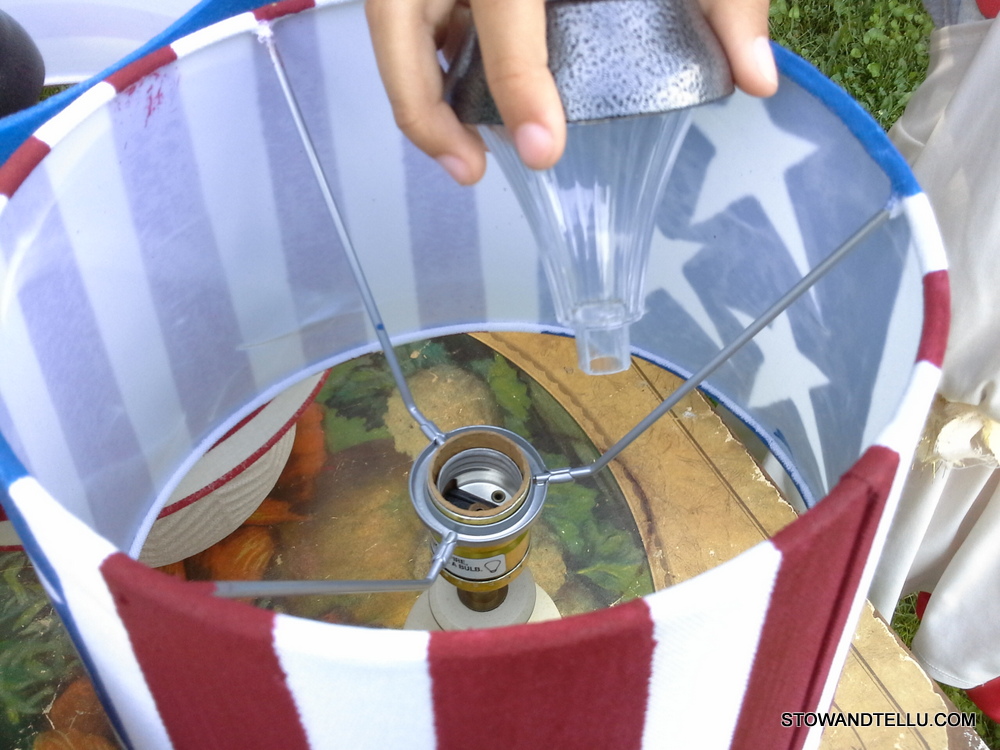
I basically followed this DIY outdoor table lamp tutorial from Houzz.
The only thing I did differently was that I didn’t fully remove the wiring, but I did cut it down so that it no longer showed.
A few helpful tips:
I had a couple of minor bleed-throughs, so make sure if you are going to try this, to smooth the tape well, or use the “expensive” painters tape, or try using masking tape which adheres very well to fabrics.
Try to use heavy lamps as the lighter ones will tend to blow over if it’s windy. You can also try this method for weighting down a lamp base.
Although these have a clear coat spray, they will weather if left to the elements, just like anything else. Placing them under a porch overhang when not in use would be recommended.
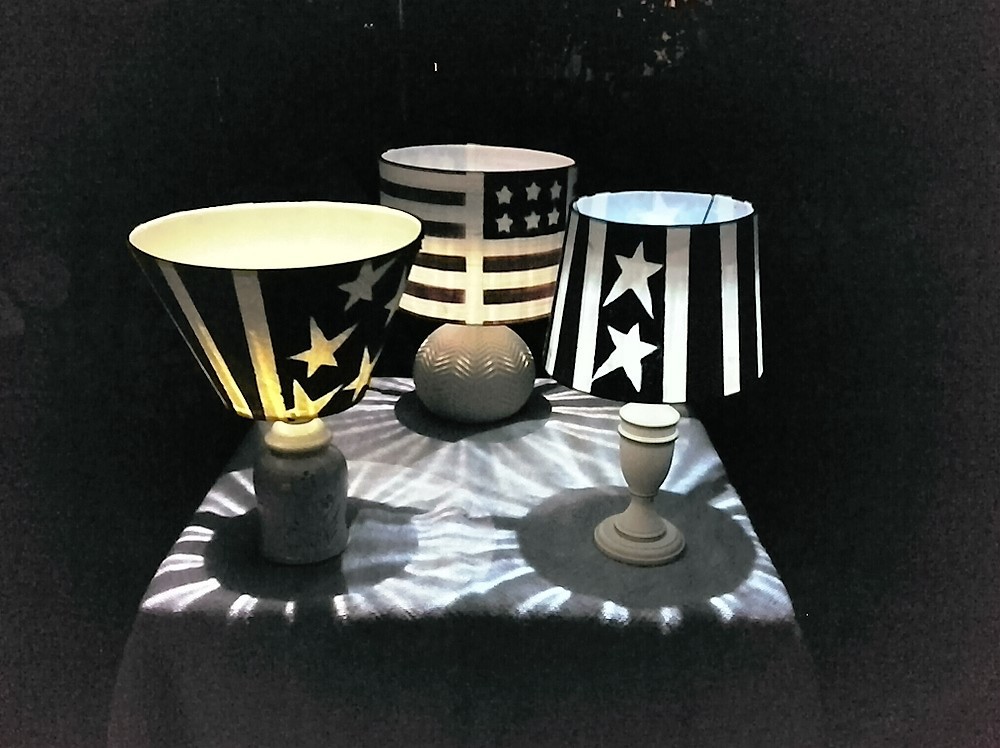
Cute idea for a summer party? What do you think?
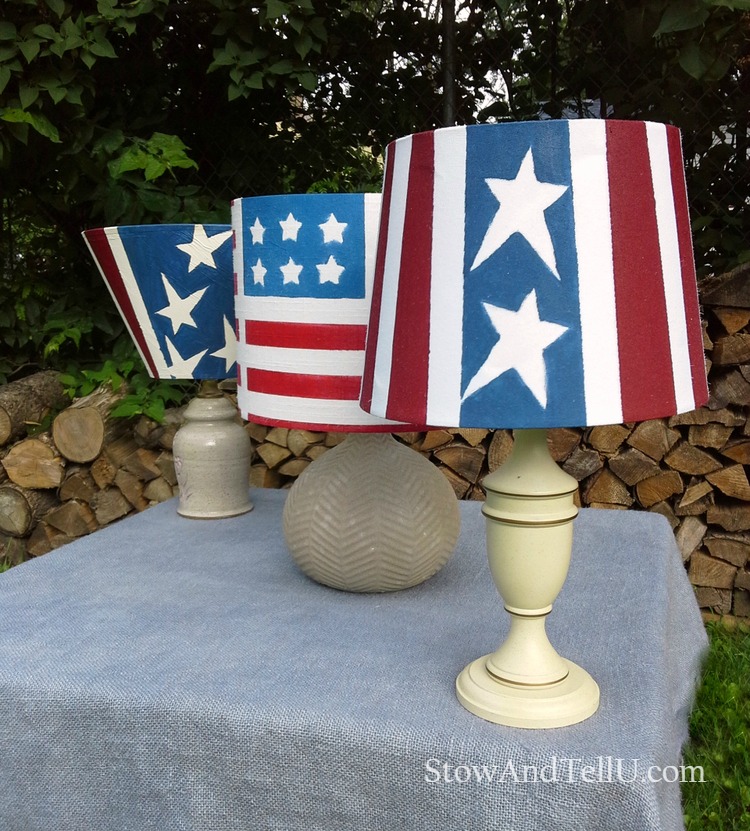
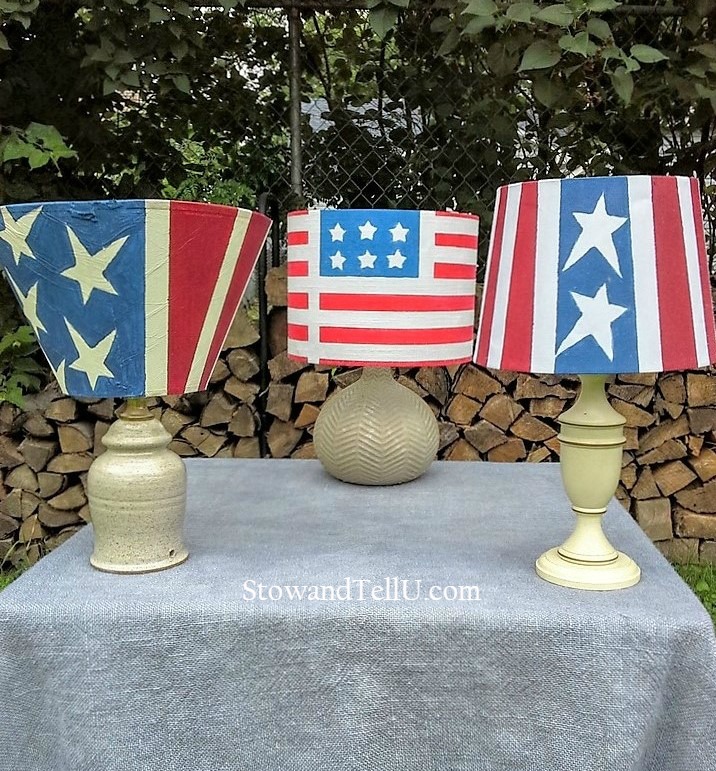
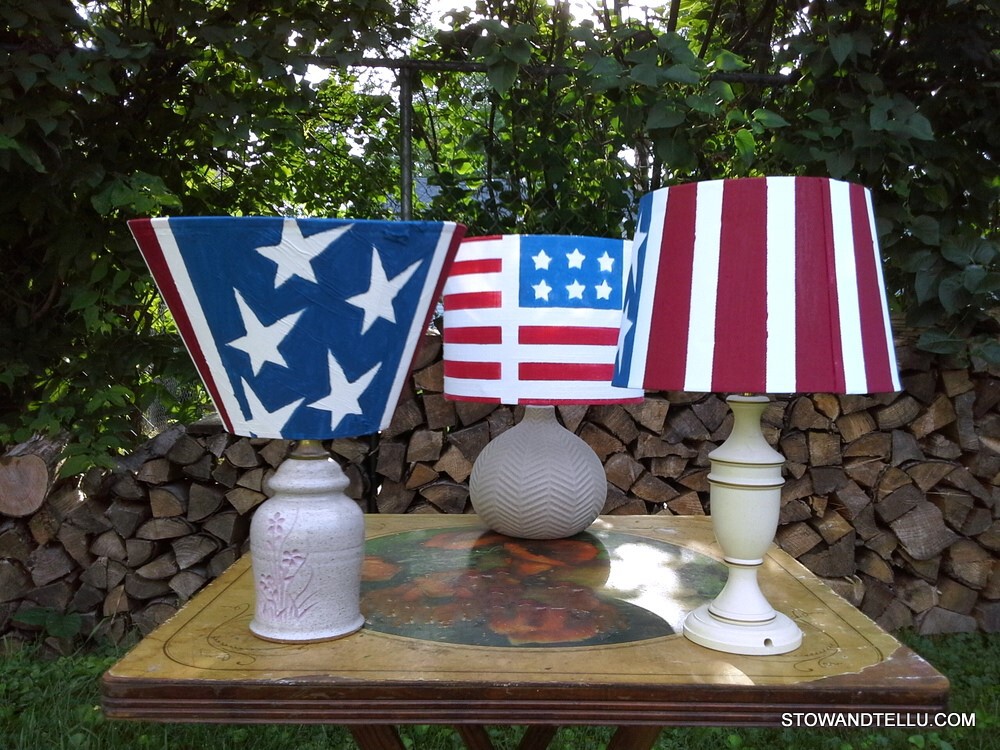
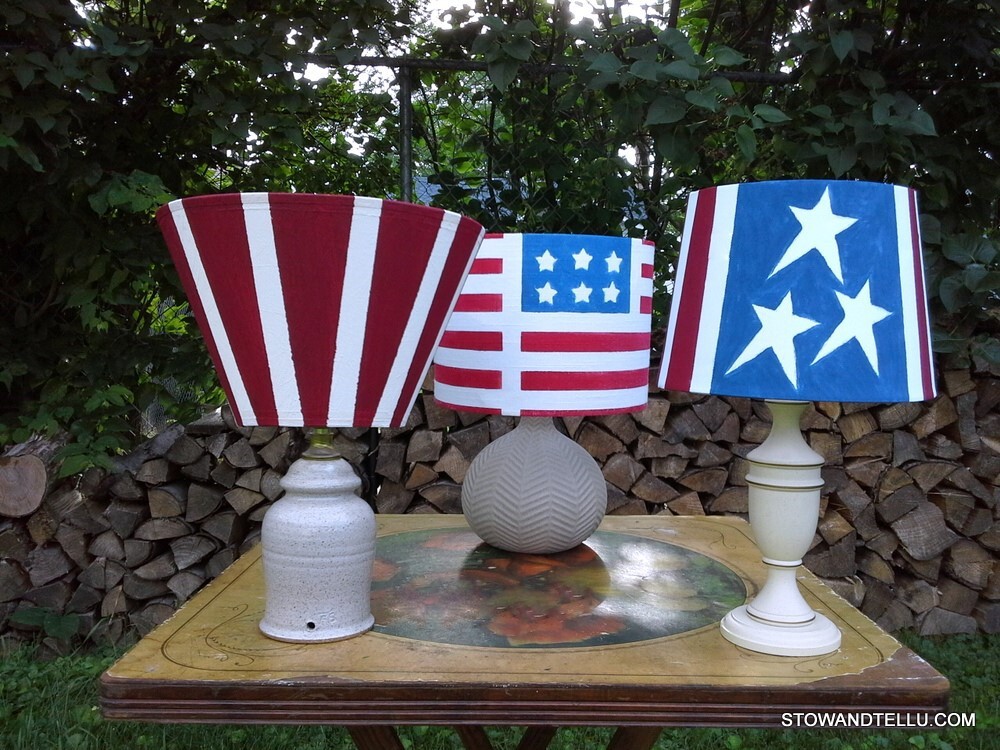
I used a lighter red and blue color on the middle one and a darker red and blue on the two others.
The lamp shade on the left has more of a texture, and it was yellowing. These defects only add to the “wrinkled old flag” look. Which is pretty darn cool, if you like that sort of thing.
You can see where the trim was cut off, also.
But I say, whom at your Fourth of July party is going to point that out? 😉
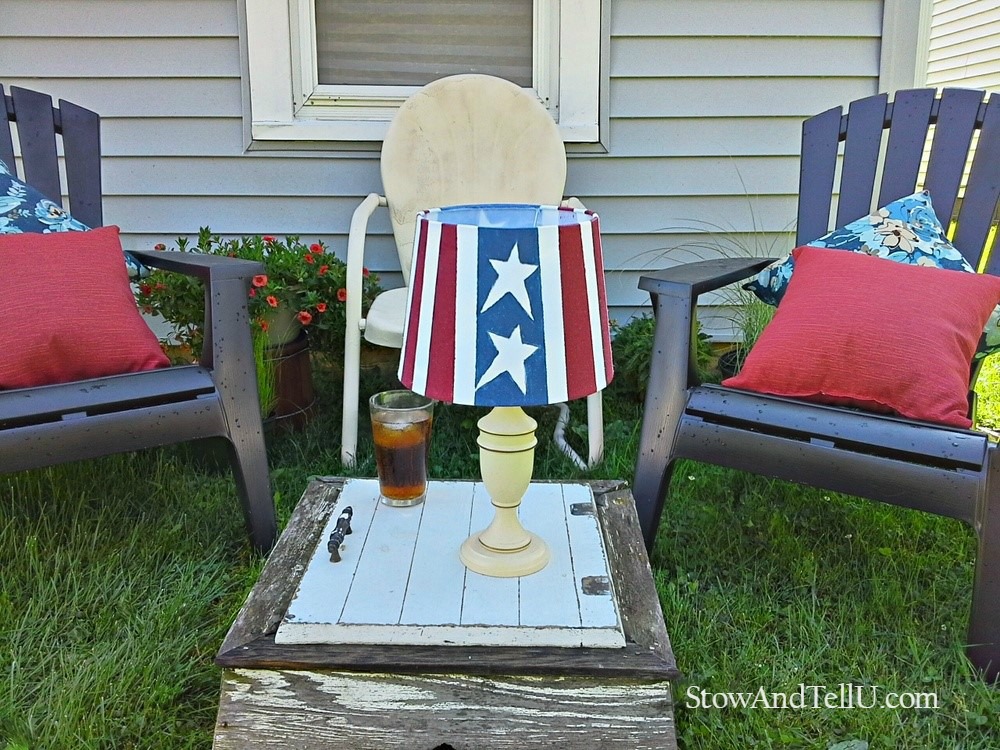
And how festive would this be on an outdoor patio, during the day?
Thank you so much for checking this out ~ Amy
Please, scroll on down to see what else has been made from junk for love of country!
Claire says
These lamps look amazing ! I also love that you have turned them into solar lamps for outside as well. Really good tutorial as well. Thanks
Tammy says
wow … what a fun solar lighting idea so creative these really came out grea! Pinned
Amy says
Thanks for pinning, Tammy 😉
Kim Jones says
I would never have thought to do the solar lighting!!! Very clever and love the look of that! Cute, fun lamps for partying!
Amy says
I might give a few away as gifts, too. Thanks so much, Kim!
Sharleen Wolfe says
WOW these are amazing.. I love them..
Amy says
Thanks, Sharleen xo
Lucy ~ Patina Paradise says
Amy you are the lamp shade repurposing queen! lol Great idea to use them as solar lamps. I especially love the one with the two stars one above the other. It looks great with your outdoor seating area!
Amy says
I think that one is my favorite, too, Lucy, thank you 🙂
Keri says
Amy, these lamps are so cool!! They look great and what a neat idea to turn them into solar lamps for outside. Awesome upcycle!!
Amy says
Thanks so much, Keri!!
bert says
where do you find the solar lights to fit in the lamps?
Amy says
Hi Bert,
I bought mine at Meijers, but the have the same ones at Wal-Mart and most other large department stores.
bert says
Thank you so much for the quick reply !!! and I hate to seem like a ninny—lol—-but are these the solar lights that come on the stakes to put in the ground? and you just removed the stakes?
Do you think you could do the same with a floor lamp?
Thanks again……….
Joan says
What a great idea. Now I need a solar lamp, I didn’t even know I needed one 🙂
Feral Turtle says
This is so clever Amy! A great design too. Maybe one of these days I can copy you and make one with a maple leaf! Pinning!
T'onna | Sew Crafty Crochet says
These lamp shades are amazing! And they look so fun in the dark, too! Thanks so much for stopping by the Celebrate the USA Link Party!!!
Kim~madeinaday says
Cool idea for a solar light! Love the shades too! Thank you for sharing on Merry Monday! Hope to see ya next week!
Kim
Parsimonious Décor Darling says
These are adorable. I found you via The Scoop.
Emily @DomesticDeadline.com says
What a fun way to repurpose old lights and decorate for the 4th! Thanks for linking up to #HomeMattersParty
Dagmar ~ Dagmar's Home says
I love this idea and am featuring it at my latest Dagmar’s Home link party!
http://www.dagmarbleasdale.com/2017/07/healthy-patriotic-snacks/