

Sometimes it takes a lot of gumption to tackle a bigger project, like refinishing a dining table. To start with one would most likely anticipate the process of removing the original finish. This step alone could deter even the most enthusiastic diyer. Now, I know that there are some people who can work their wood stripping magic, and they don’t find that task too difficult. Me, on the other hand, and perhaps you, too, might not agree. Umm. I’ll take the easier method behind curtain number two, please. This post shows you an easier way to successfully refinish a wood dining table without having to strip-off the original finish.

The key to re-staining a wood dining table top without having to strip off the original factory finish is to create a soft, faux wood grain appearance with gel stain. Followed by several coats of a durable clear sealer. It’s actually not that hard to do. The main thing you will need, beside supplies is TIME. It will take several days to let each coat dry and several more days to let the sealer coats dry.
I have used a similar process in the past for fixing the awfully bad stain color on our wood crate side table. The result has been amazing, honestly. The surface of our crate table has held up so extremely well that I knew the same would work for our golden pine wood dining table.
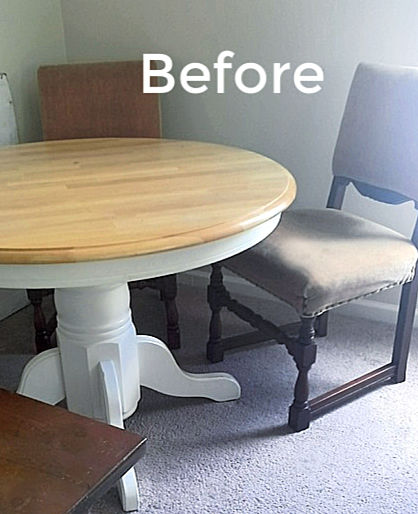
Following is the step by step process for refinishing a circa 1980-1990 era pine wood dining table top with gel stain. Without stripping the original factory coat, (See my “additional tips” below before you use this method on older, antique type tables). This gel stain process can also be used on any other parts of a table, as long as the original coat is stain and not paint. In our case the base of the table was painted, so I simply chose to repaint the base part with chalk paint. Note: gel stain can be applied over paint, but this post will not cover any specifics on that subject. See “additional tips” below.
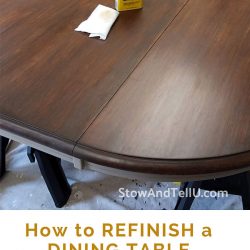
How to Refinish a Dining Table without Stripping Off the Original Coat
There are really only 4 main steps to this process. Prepping the top coat, applying the first coat, using a faux wood staining technique on the next few coats, and lastly, applying the sealer.
This post contains affiliate links. See full disclosure, here.
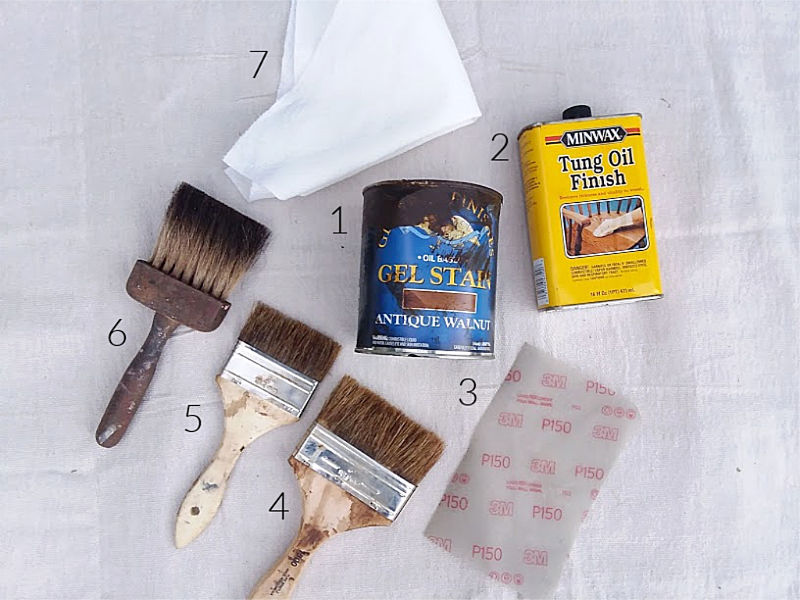
Supplies to Refinish Wood Dining Table Top
Basic items
- Gel Stain – I used General Finishes Antique Walnut, plus a few dabs of General Finishes Gray
- Clear coat sealer for oil based stain – I used MinWax Tung Oil Finish
- Sand paper: 150-220 grit and 400-600 grit
- Large chip brush – 4″ (or a General staining brush)
- Small chip brush – 3″
- Softening brush
- Lint free cloth, I used Viva paper towels
Also needed
- Large foam craft brush
- Tack cloth
Optional
Step 1) Prepping the original top coat for gel stain
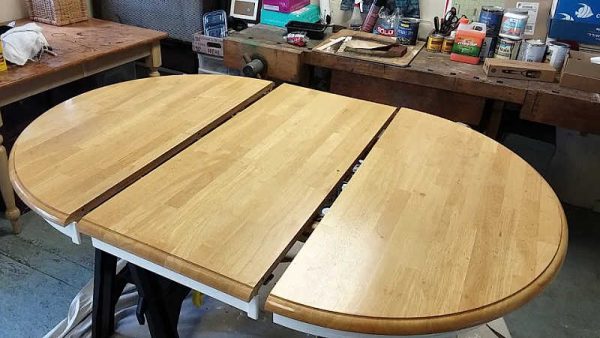
In order for the gel stain to adhere nicely you want to create a clean oil-free, lightly sanded surface. Follow these steps below:
- Clean the table with a good degreaser product.
- Gently sand the surface with 150 to 220 grit sandpaper.
- Wipe the surface down with a tack cloth.
- Optionally, Apply a deglosser per the product label directions (this step is optional, I did not do it, but if your table top has had lots of use, this will cut additional oils and residue that may be harder to clean off.
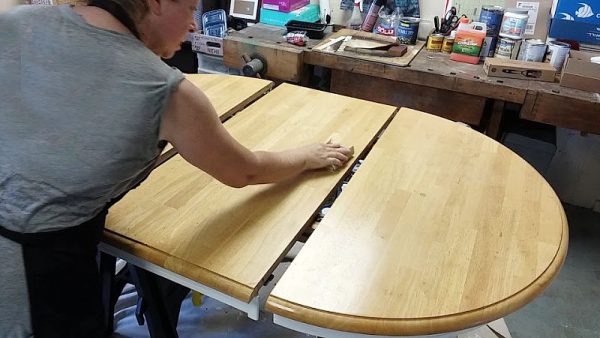
Step 2) Applying and the first coat of gel stain to the table top
 In regard to the first coat of gel stain, you will want to apply it all over the table, let it sit for a few minutes, and then rub it in with a soft cloth. This will give the table an overall slight change of color. Make sure to work in one section of the table at a time, but don’t worry about being too perfect because this coat will be rubbed into the surface. To do this follow these steps:
- Use a foam brush to dab the gel stain onto the surface.
- With the 4″ chip brush, smooth the gel stain out over the surface.
- Move on to the next section of the table and repeat.
- Lastly use a soft, lint-free cloth to rub the gel stain in evenly all over the table.
- Allow the gel stain to dry per the brand’s recommended directions.

Pine wood table top after the first coat has been applied.
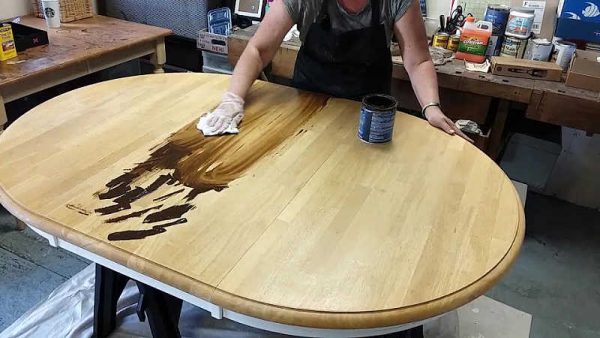
Step 3) Adding a second and third coat of gel stain using a soft, faux wood grain application.

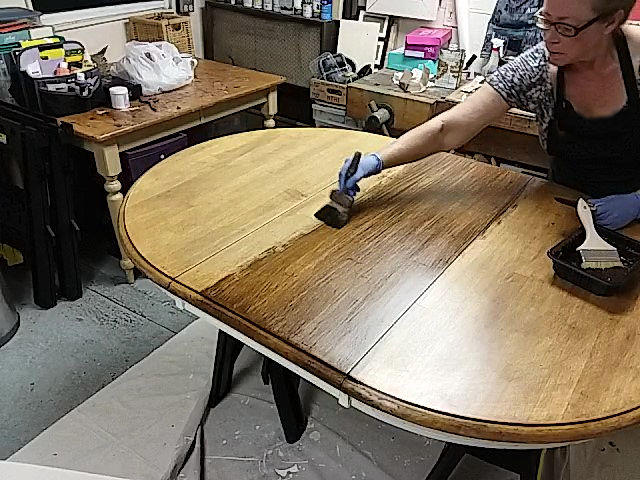
Applying the 2nd coat of gel stain with a 4″ chip brush.
When applying the next two coats of gel stain, you will want to use two additional paint brushes. A 3″chip brush and a softening brush. These two brushes will help you to create a soft faux wood grain appearance over the first coat. Follow the steps below by applying a second coat, allowing it to dry and then a third coat:
- Gently sand the surface with 400-600 grit sandpaper, or extra fine steel wool. Then remove the dust with a tack cloth.
- Use the 4″ chip brush to apply the gel stain in straight back and forth strokes across the width of the table top.

Dragging a 3″ chip brush through the gel stain to create a faux wood grain look.
- Next pull the 3″ chip brush through the gel stain in the same back and forth strokes. Trying to go all the way across in one sweep (as best you can. Remember wood grain is not perfectly straight). You should see lines that show through to the coat underneath.
Using the softening brush through the gel stain to create a faux wood grain look.
- Then sweep the softening brush across the gel stain surface in a very light gentle motion. The idea here is to soften and blend those lines so it looks more natural. Allow the second coat to dry per label directions.
- Repeat steps 1-4 for the third and potential forth coat. Each coat will darken the appearance.
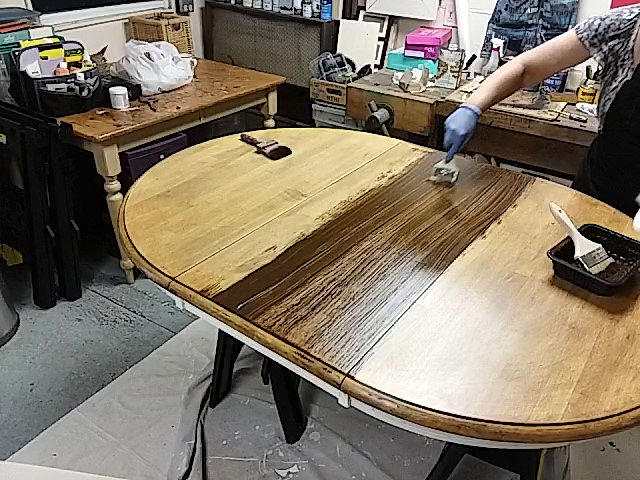
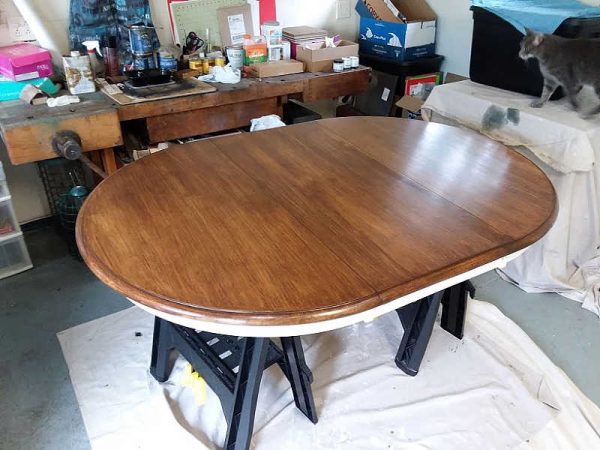
Antique Walnut Gel Stain on Dining Table after the 2nd coat has been applied.
Step 4) Sealing the surface with a durable top coat

Dining Table finish 4 coats of Antique Walnut Gel Stain , plus a few dabs of Gray Gel Stain.
Applying a top coat, especially for a dining table is of utmost importance. I suggest using a wipe-on type top coat because this type has a longer open time for application then the brush-on types, in my opinion. I like to use this tung oil finish by Minwax because I have used it on other projects with great success. It works wonderfully over gel stained wood and once it’s cured, it is extremely durable. Better than some factory top coats, in my opinion. Another similar product is the General Finishes Arm-R-Seal.
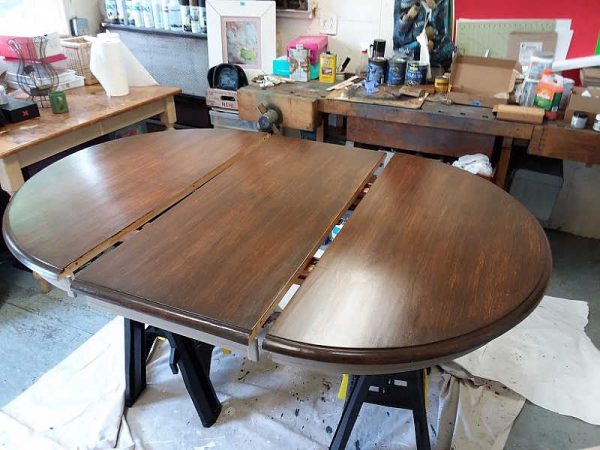
Antique Walnut Gel Stain (4 coats, plus a small amount of Gray) on Dining Table after the clear coat has been applied.
Which ever top coat you choose, make sure to follow the product label directions for usage and safety. Also make sure to allow for drying and curing time (which can be up to 20 days, but should be listed on the product specs).
Additional tips to follow for success when you refinish a dining table with gel stain
For the absolute best success, keep the following tips in mind:
- Make sure to wear all recommended safety protection, such as latex gloves and follow all of the other safety instructions, per product.
- If your dining table has a leaf insert, keep the table and leaf pushed together while applying the gel stain and top coat. Then to prevent the pieces from sticking to each other, pull it apart while it is drying. You can gently sand the inner edges after it is dry, if you have any drips and such.
- This gel stain technique can also be used over a painted surface, however I would recommend giving the surface a base coat of paint in a neutral color that would mimic the lightest shade of wood you are trying to achieve, like ecru, tan or off white.
- If any layer of your surface has paint, make sure to use a sealer top coat that can be applied over paint. Some top coats are for wood surfaces only because they penetrate the wood.
- To clean the gel stain product off the staining brushes, make sure to use mineral spirits or some type of cleaner for oil based stain.
- For older and antique tables: Gel stain may not be the solution for all wood tables. If you have an older, antique table, some of the more traditional refinishing solutions may be a better option. See this Updated Sears and Roebuck Side Cabinet for tips on refinishing older wood furniture.

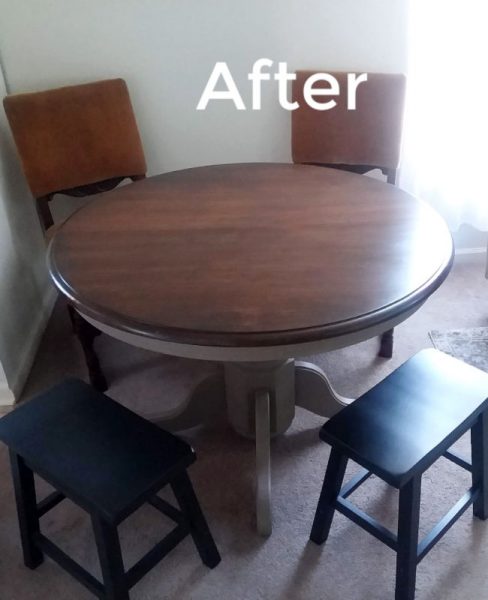
This dining table project took me over a year to finally refinish because I was so avoiding the process of stripping off the original coat. I’m so grateful now, that I finally considered this gel stain method. The table update has made a HUGE improvement in the cohesiveness of our living room / dining area.
If you have a wood dining table that you’d like to refinish, I highly recommend you consider re-staining it with gel stain. Follow the 4 step process of prep, base coat, faux wood grain application, and finally applying a durable top coat finish. You will have skipped the whole messy act of stripping off the original stain, yet your table will look undetectably re-stained. It will fool even you.
Brooklyn says
Love this! My husband and I have stripped and refinished furniture before so I’m really wanting to avoid that process for my dining table. Do you have any tips on potentially going from a darker stain to lighter stain instead of lighter to darker? Thank you!
Amy says
Hi Brooklyn,
In regard to going lighter, what I would most likely do is paint the table a base color in the ochre family, which is yellow toned and very commonly used for faux wood graining. Let that dry, then apply a faux wood grain technique using gel stain over the paint. Depending on what wood tone you are going for your base paint could be anything from white to light yellow, to deeper ochre. Gel stain will work over most painted surfaces.
So, figure out what the base color is of the wood type you are going for. Do that layer in paint, and then figure out what the wood grain tones are for the wood type you are going for and do those layers in gel stain.
That is how I would approach it, and as a matter of fact, I have a painted chair that I plain to give a faux wood look to soon, and this is going to be my approach.
I hope this helps, but let me know if you have any other questions.
Best of luck,
Amy
Lee Fielding says
I refinished a veneered table and it is blotchy. If I remove the varathane, apply a shellac and restain and varathane will that get rid of the blotches?
Thanks.
Amy says
I cannot say for sure if stripping and applying shellac would remove the blotches. However, you may be able to cover the blotches by creating a new finish with the gel stain technique which you can apply right over the varathane (just give the surface a light sanding before applying).
Joanna says
Hi, does this process allow any of the original grain to show through or is it all the new faux grain you design? Have a table with a yellowish wood and pretty hard top, maybe laquer, so I don’t want to strip, just go over top with a darker tint.
Amy says
Hi Joanna,
I’m so sorry for the delayed response. This process will show the faux grain you create. But the lighter color of the table you are covering will show through just slightly, which helps make the faux grain. In other words, to make a faux grain with a dark stain, you need a lighter color base. So if your table is lighter than the stain you apply, the dark and light combined will create a grain appearance. I hope that makes sense. As an example, a similar approach could be used with paint. One would paint that base coat a light tan/golden color, and then apply a mix of several dark brown shades (mixed with paint glaze) over the tan/gold using that faux grain tools.
I hope that helps.
Good luck with your project.
Taylor Enders says
Hi! Thinking about refinishing our dining room table! Yours turned out beautifully! Roughly how many hours did it take you?
Amy says
Hi Taylor,
I would say it took me about 12-15 hours, not counting drying time. I did the project over several days allowing 24-hour dry times in between.
Abbie Aggie says
Hi, your table looks awesome! Would you consider a cherry stained provincial (not 100 year old original provincial, more like the kind everyone’s grandparents had from the 70s) an antique wood? It was pretty standard back then and I scored a full set but gave the chairs and small hutch to neighbors. I just wanted to refinish the table (it is huge with the leafs in it and would love in my kitchen/dining area). I want to try this technique since the table is so large. Plus I keep seeing the General Finishes gel stain on Amazon and have been wondering what I can try them on.
Amy says
Hi Abbie Aggie,
In a simple answer, no, I wouldn’t consider it an antique, per se, because it’s not 100 years old. When I consider painting or refinishing a piece I ask myself if it was mass-manufactured, rather than manufactured in small-batch or handcrafted. By the 1970s many of the table sets were mass-produced, so there’s a lot more of them. In my opinion, I would use this application on the table because those darn tables were made exceptionally well back in the 70s. You will a) like it much better and b) save it from going to waste. I’ve seen rows of these tables in the large antique mall near my house. Hopefully, more people like you will consider re-finishing one. Good luck and let me know if you have any other questions.
Hollie says
Hi Amy-
What you had done with your table is exactly what I plan on doing with a second hand table I have purchased. In fact, your description of each step is written out so perfectly that my ADHD brain can follow along without loosing track of what I need to do next. One question I do have is in regards to the “softening brush.” As much as I want my table to turn out as perfect as yours did I just can not swing the cost of the softening brush, is there another product or brand you could recommend? I have listed out each product you used and will be heading to Lowe’s since my wonderful husband gave me a gift card from there, for Mother’s Day. ☺️
Amy says
Hi Holly,
I would suggest using the softest inexpensive standard paintbrush you can find. Don’t go too cheap because those tend to lose bristles more easily (and then you have to pick them out.) Try to go with one in the medium price range. Alternatively, you can try a wide chip brush. Work it gently with feather-light touches over the stain. Good luck. I hope this helps. Let me know how it turns out.
Thanks, Amy
PS – Great Mother’s Day gift – great hubby you’ve got there 🙂
Molly says
This was my question too! The softening brush is $47 on Amazon. I’m going back and forth about getting it. I tried looked for a less expensive one but wasn’t sure if I would get that same look. Thanks for your response. On one hand I can justify it b.c I’m not spending $1200+ on a new table, and I’m going to do my chairs too so I may just go for it!
Molly
Amy says
Hey Molly,
Yes, I think it’s worth the money. I’ve had my softening brush for about 15 years. I’ve used it for both paints (latex-based) and stain (oil-based.) The key is to clean it really well after use, based on which product type you are using. Best of luck with your table and chair makeover.
Debbie says
I am going to try this on my cherry wood kitchen table and chairs. The chairs have deep gouges/grooves on the seat from embellishments on jeans pockets. I don’t think it would be feasible to try and sand these out. Do you have any ideas of what I could do to fill in or somehow diminish the grooves?
Amy says
Hi Debbie
Yes, you can use wood filler which you can find at most department or home improvement stores, or online. It’s very easy to use, follow the directions, you should have no problems. It may take a few applications to fill in the holes completely, depending upon how deep. Wood filler usually requires some drying time. Tip: Use an old credit card as an application tool. Works great on small holes and divots.
Best of luck with your project. I’d love to see before and afters 🙂
Sally Sneyd says
Wow Amy, this is my table. I was looking at how to stain and reseal it as it’s lost its lustre and is soaking sauces/stains in. My question is: Can I stop at one coat of gel stain? Want a rustic look and not too dark. Thoughts?
Amy says
Hi Sally,
Yes, you can stop at one coat, you can also use a lighter stain color so there isn’t as much of a contrast.
To apply one coat only, use a cotton cloth, wipe it on heavily, and then wipe off some of the excess. Test this process on scrap wood beforehand so you feel comfortable with applying the gel stain this way.
One more thing, the topcoat I used on this dining table has more of a sheen that you may like for a rustic appearance. In the past, I have used General Finishes Gel Top Coat Urethane in Satin and have had great success with that.
I have more details on how to use this topcoat in this post: https://stowandtellu.com/the-easiest-clear-coat-painted-furniture/
Best of luck. You’ve got this!
Amy
mary sawyer says
HI Amy,
I would like to refinish my kitchen table, but there are a few spots that may need wood filler. Will the stain gel cover wood filler? Is there a particular product or process you recommend to fill nicks and scratches?
Thanks!
Amy says
Hi Mary
I recommend a stainable wood filler. I know that Minwax has one. Also, I like to use an old credit card or gift card to apply the filler. The card is smaller and easier to work with. Depending on how deep the hole is you may have to apply the filler several times to build up the gap. Good luck!!