We have a big Christmas get-together each year and as a tradition, we make homemade ornaments for everyone. There’s almost forty of us, and it’s never on Christmas day. There is just too many of us. We ALWAYS try to make these ornaments on the cheap, and I’m usually the one who has to come up with the idea… or maybe I insist, but who is keeping track? Anyway, I’d been tossing around ideas and came up with a rustic twig Christmas tree on a cutting of plain old cardboard.
 The twigs were collected from the yard = FREE. I salvaged the cardboard from cereal and soda cartons = FREE. For the cost of some hot glue and a sparkly pipe cleaner, I was able to make these ornaments for almost nothing.
I’ll have to get final approval from the, ahem, Board of Annual Homemade Christmas Ornaments (aka: sister and nieces), but I’m pretty sure this is the ornament we are going to go for this year, and here is how we are going to make them:
How to Make Rustic Twig and Cardboard Christmas Tree Ornaments
This post contains affiliate links. See full disclosure, here.
Supplies List
I’ve included links to products that you can purchase if you don’t want to completely go the DIY route with this project.
-Twigs collected from the yard (try for pencil sized diameter pieces) or Pre-Packaged Twigs, like these.
-Cardboard pieces from cereal boxes or soda cartons – or thick card stock
-Hot glue gun and plenty of glue sticks or a Quick-Hold Craft Glue, that I like as an alternative to hot glue.
-Pruning Sheers, like this pair (these are optional but helpful if you don’t want to hand-break all the twigs.)
-Push pin
-Pencil and paper
-Christmas colored pipe cleaners (or any kind of ribbon or twine)
 Step 1 – Cleaning and prepping twigs for crafting

(You can skip this step, if you are using the pre-packaged branches.)
Collect twigs and place them on a cookie sheet.
Pre-heat at 200 degrees (f)
Place cookie sheet with twigs into oven and dry for 45 minutes, this is done to kill off any critters.
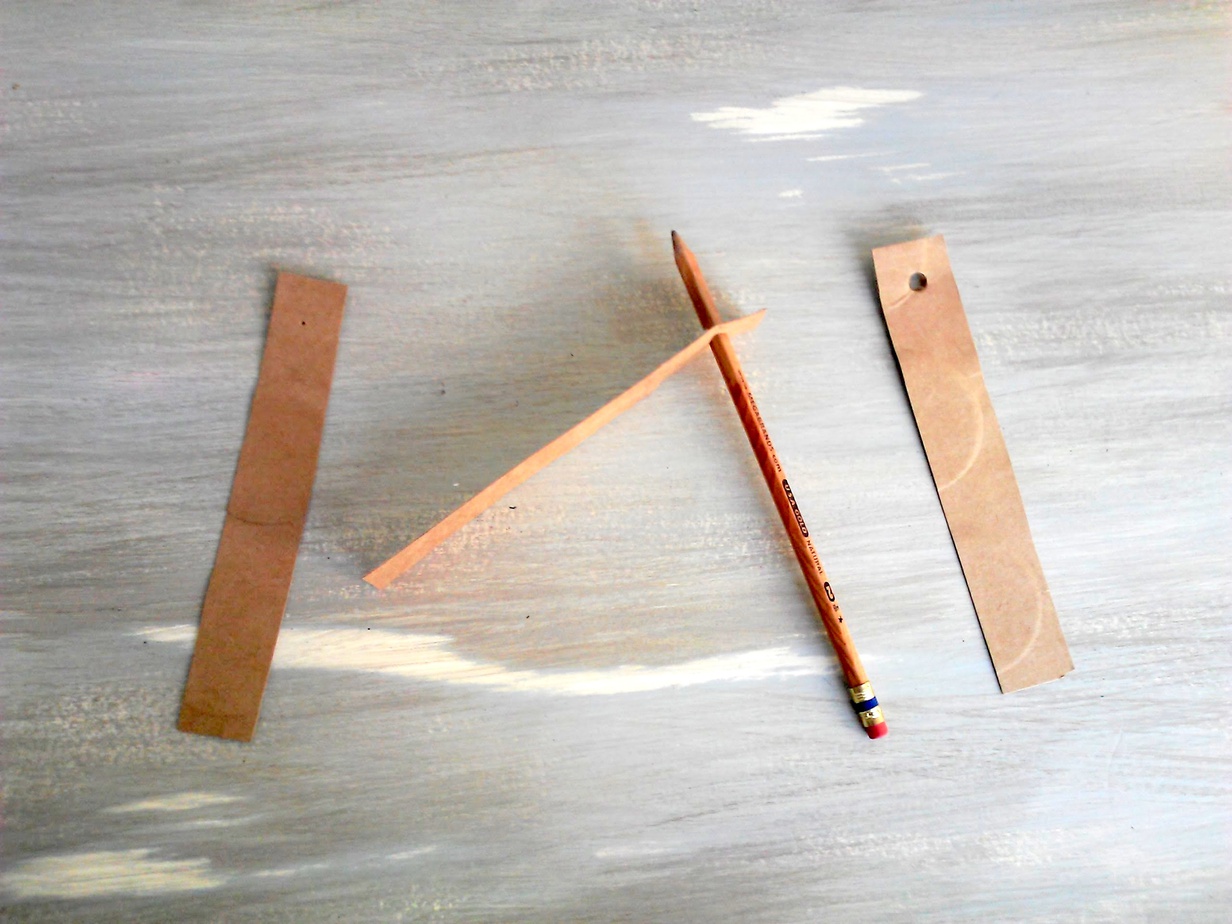
Step 2 -Making a card board ornament backing strip
Cut card board pieces 6″ x 1″
Take a push pin and make a hole 3/4″ down from top of the backing strip.
Take a pencil and poke through the hole.
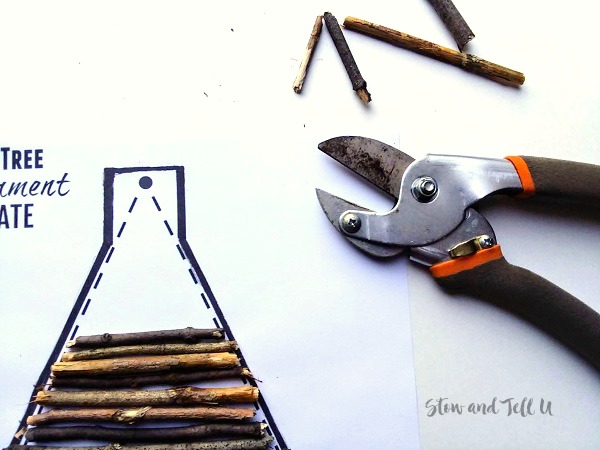
Step 3 – Using the twig Christmas tree ornament template (or making one of your own)
Use our Twig Christmas Tree Ornament Template in our FREE Printables Resource Library, which you can find ACCESS to, HERE. Or, you can make your own template on plain paper by drawing a line around the card board piece, mark for the hole, and then drawing a 4″ – 4-1/2″ horizontal line across about 1″ up from the bottom.
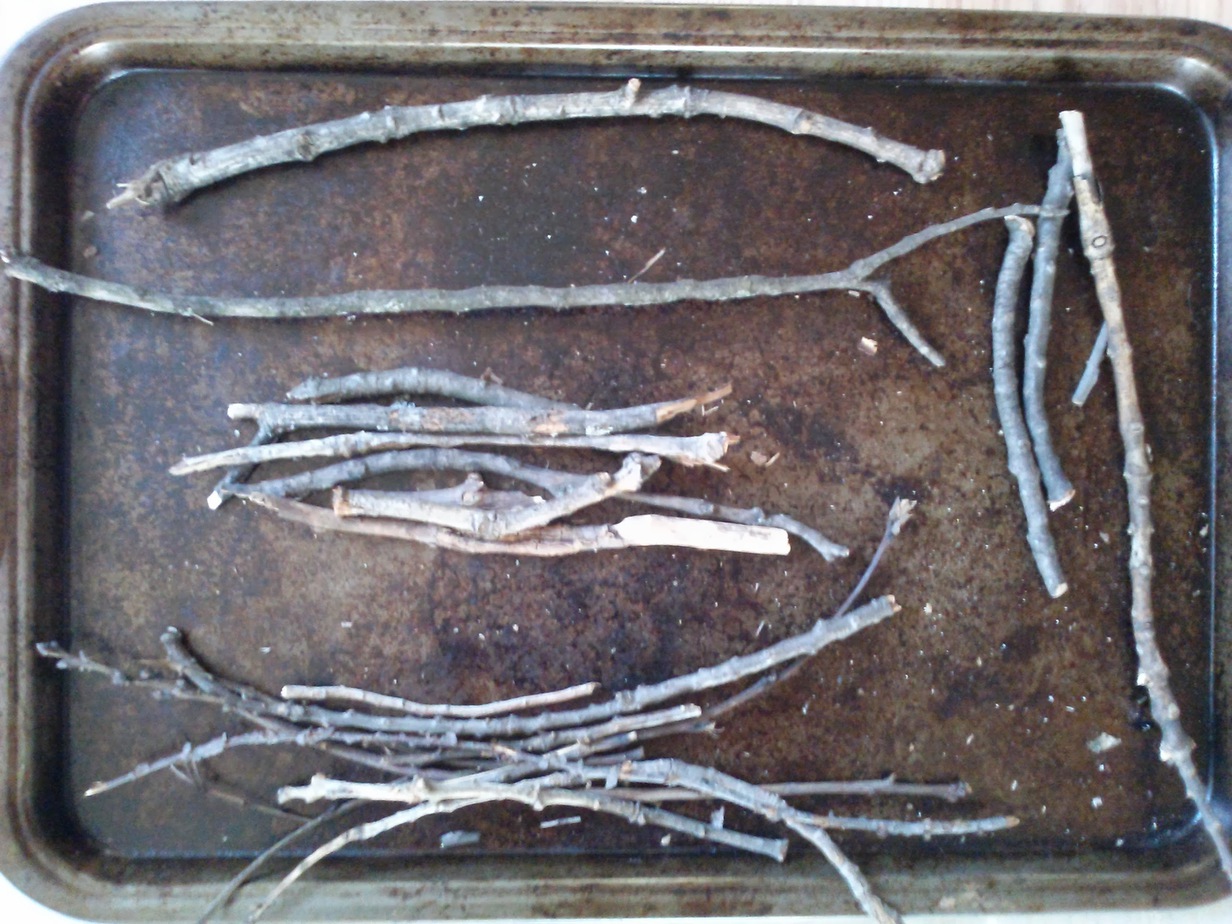
Step 4 – Organizing the twigs by size
Separate twigs into small, medium and large piles. This step helps keep you organized. Break branch pieces off the larger part of the twigs and put them into the small pieces pile. Remove any parts of bark that seem to be crumbling. Also, discard any pieces that are too wavy or knotted.
Step 5 – Trimming the twigs down to size and placing them onto the template
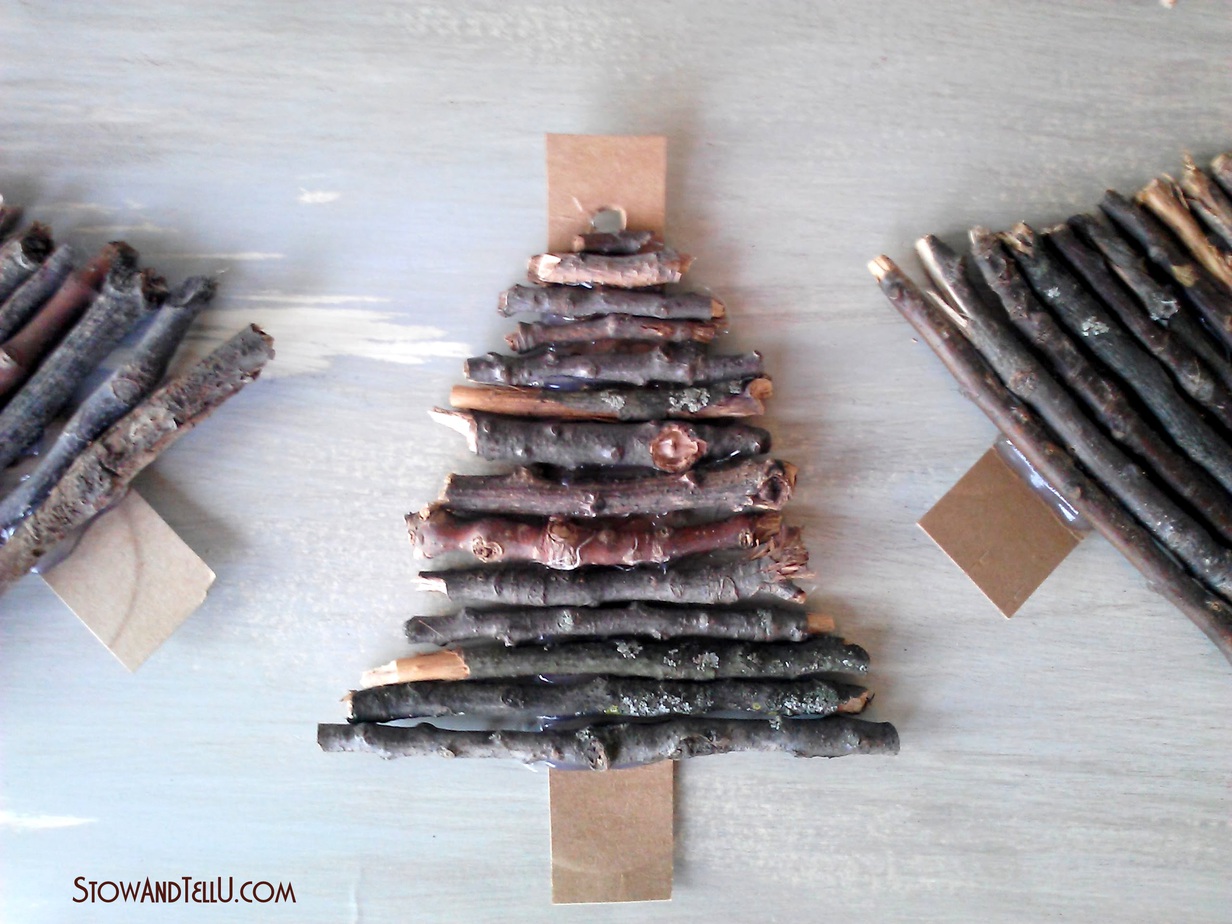
Break a piece of twig 4″-4-1/2″ long and place on the horizontal line on the paper template. Continue to break more pieces, each one a bit smaller than the one below it to build the tree upward toward the marked hole. Make sure to stop at the marked hole. This can also be done with a pruning tool if you don’t want to have to hand-break all the twigs yourself.
Step 6 – Transferring the twigs from the template to the card board backing strips
Lay one of the card board pieces down on a non-porous surface, such as a piece of laminate shelving or the back side of a new cookie sheet.
Run a thick bead of hot glue horizontally, one inch up from the bottom of the card board piece and attach the largest twig from the template. Alternatively you can use my favorite quick hold glue if you don’t want to use hot glue.
Run a thick bead of hot glue just above the twig length, onto the card board piece and place the next largest twig down. Continue to build the tree, making sure to use the hot glue to secure each twig into place by loading lots of glue along the length of each twig.
Let the glue dry for a few minutes and then pry up the piece of card board from the surface you were using to do the gluing.
 Tips:
Tips:
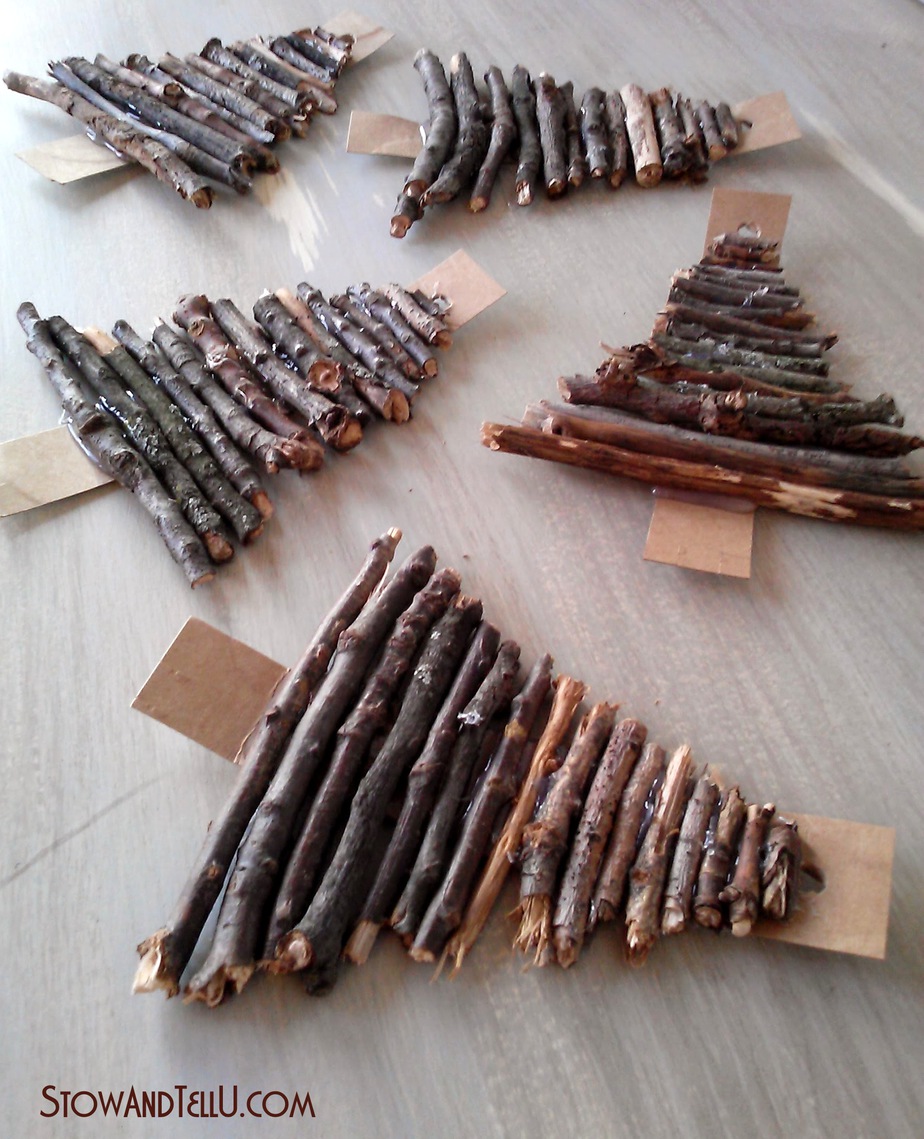
- Alternate twig types and colors for a varying effect.
- If you have knotted pieces, try to place the twig down with the knot facing upward.
- Don’t worry about making the perfect tree. Anything close will end up looking like a Christmas tree, trust me 🙂
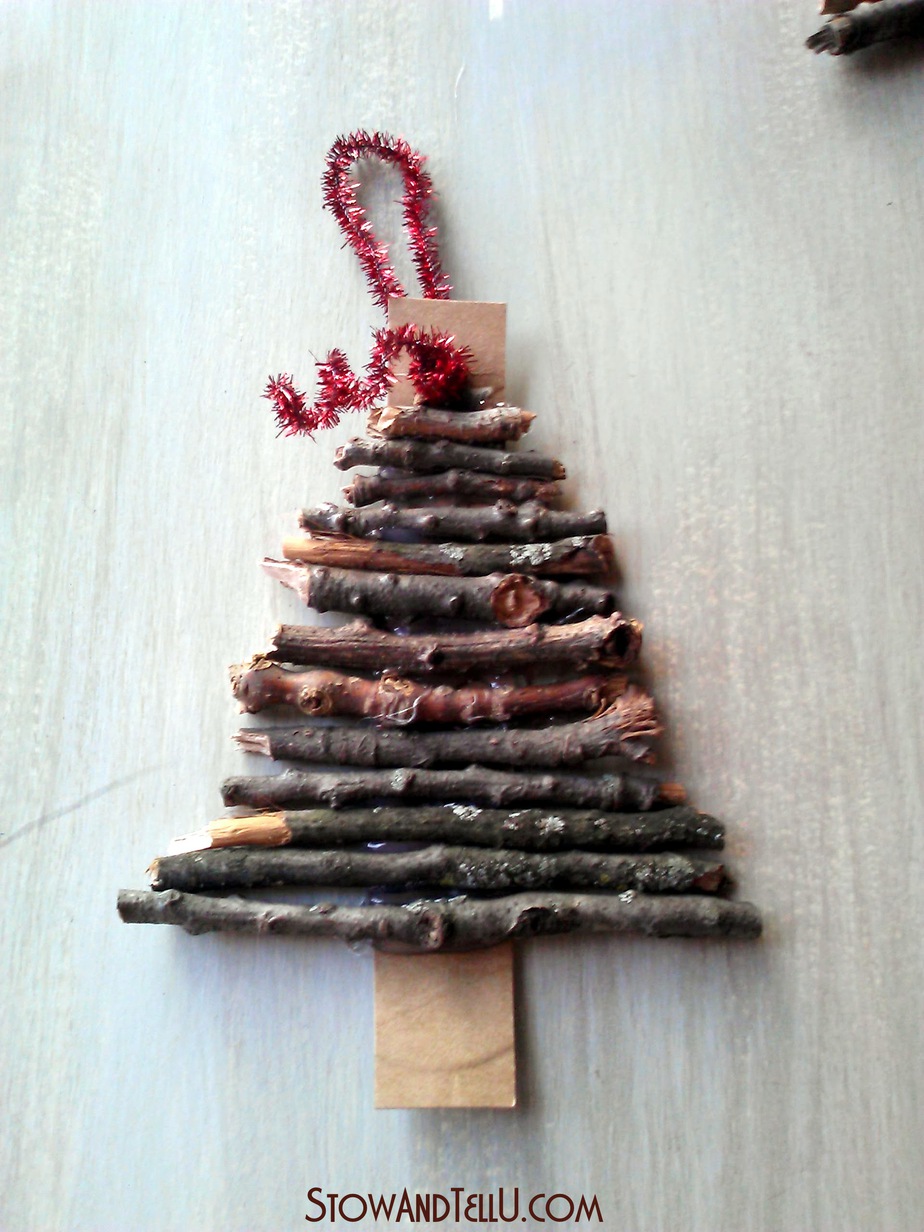
Step 7 – Adding an ornament hanger
Add any kind of twine or ribbon to create a hanger.
I made some up with pipe cleaners, which is all I had on hand at the moment:
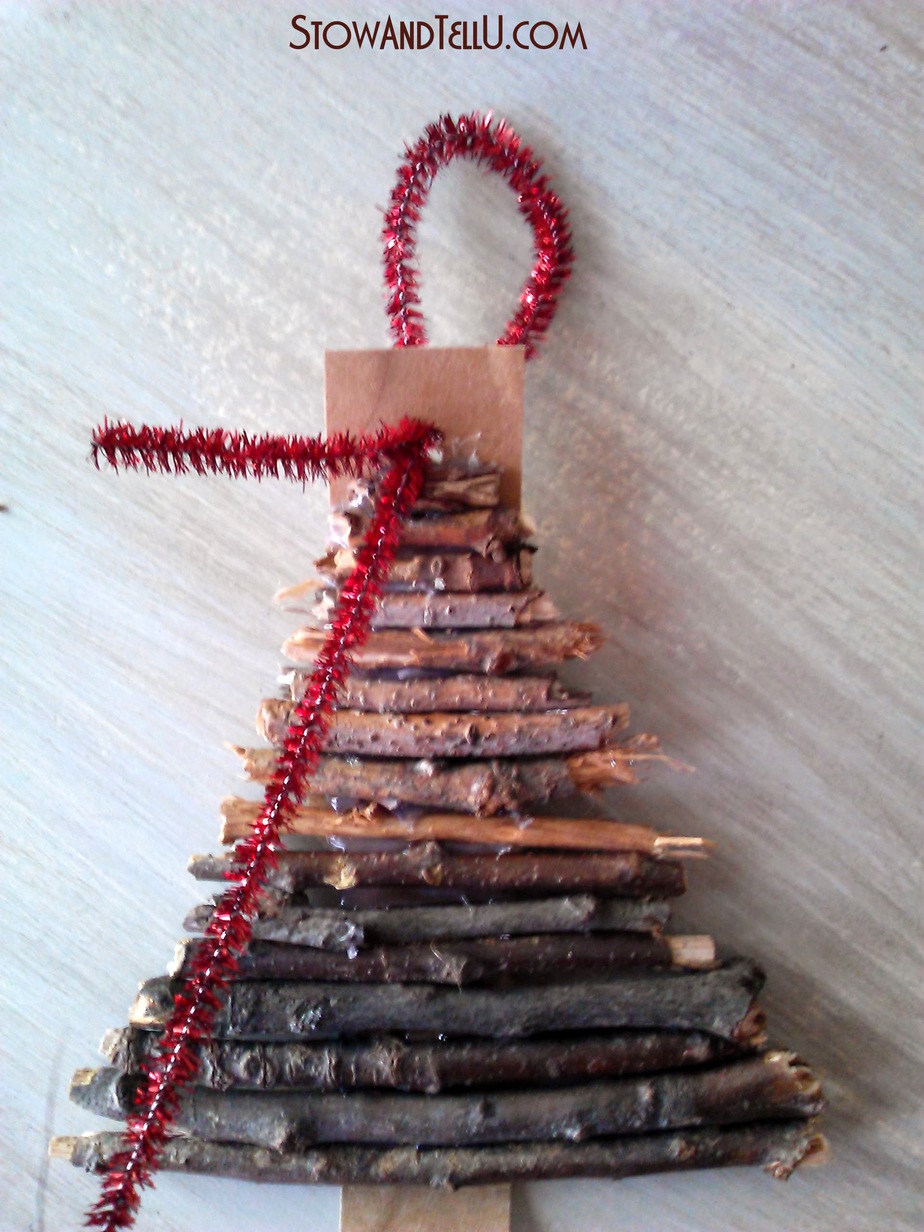 Run a piece of pipe cleaner thru the hole and back to form a loop for hanging. Leave one end long and one a bit shorter. Twist the pipe cleaner together on both sides of the card board piece.
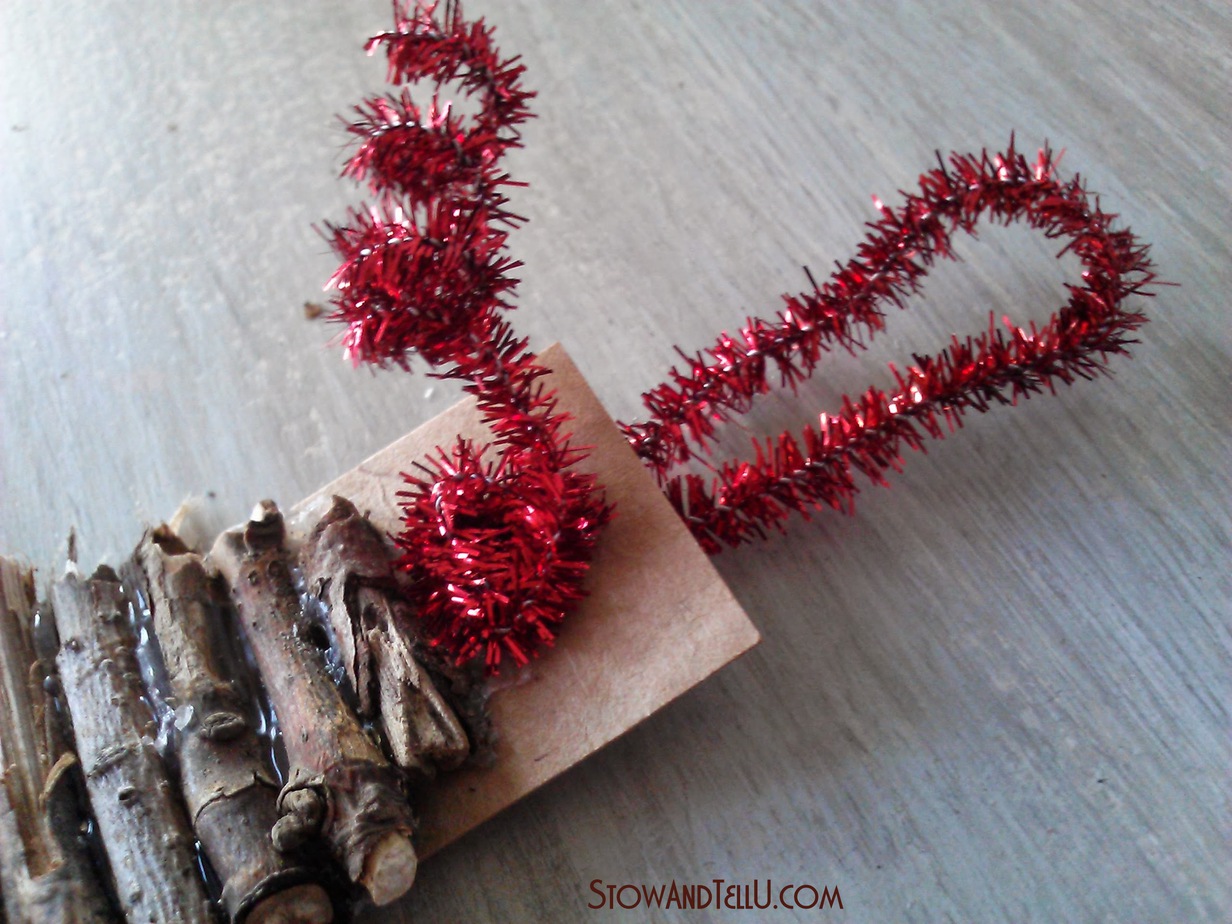 Twist the smaller piece into a ball.
Wrap the larger piece around a pencil to make a curly-Q.
Alternate ornament ideas (other than twigs)
Optionally, you could use pipe cleaners, paper straws, rustic floral craft wire, or some other type of rigid craft material in place of the twigs. Or give the twigs a coastal look with these diy faux driftwood twigs
<<Grab my easy to use Christmas Tree Ornament template, here>>
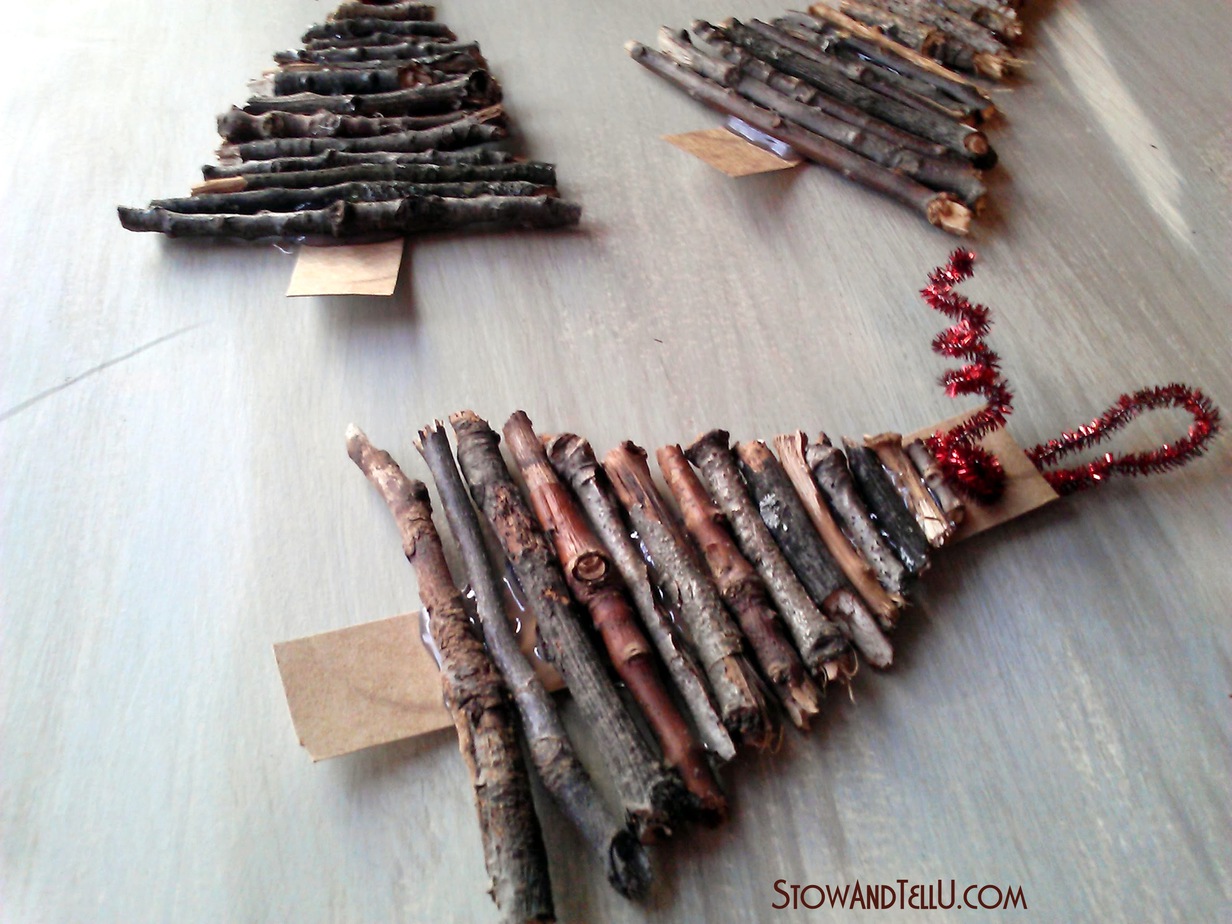
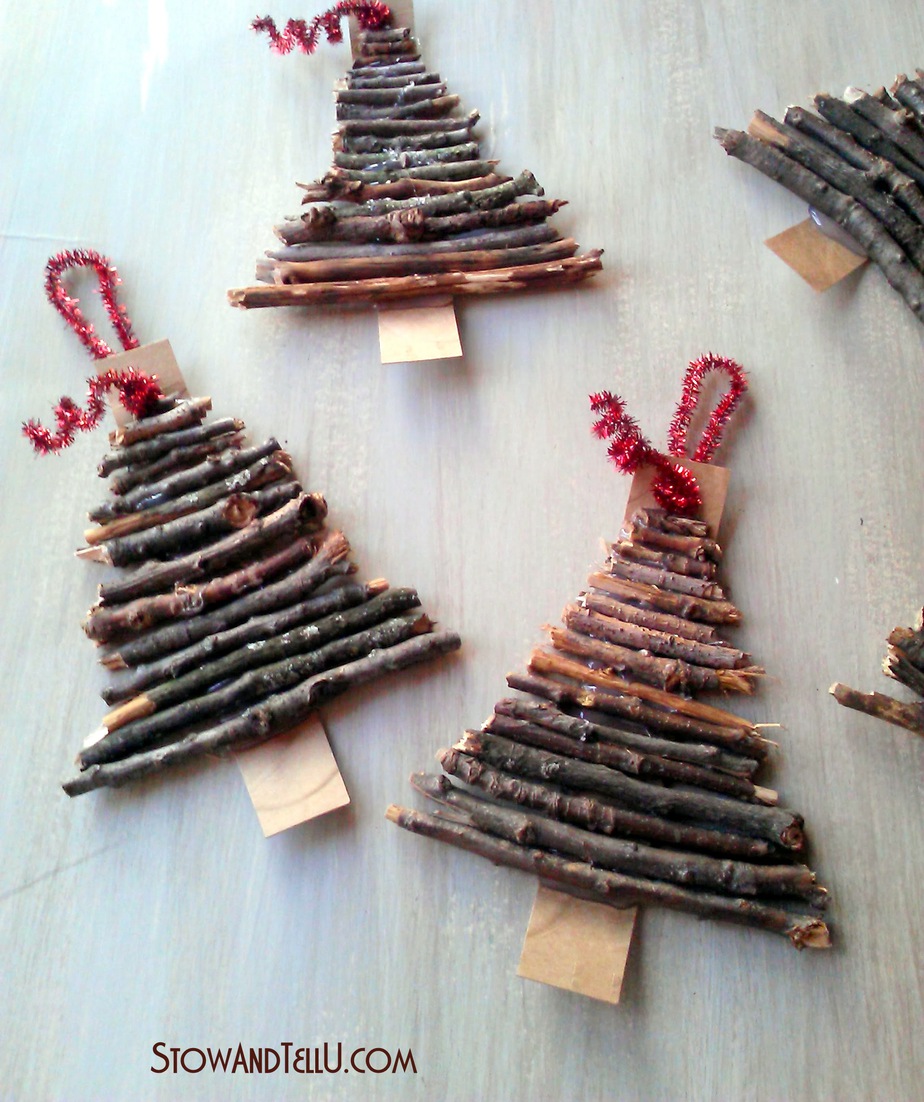
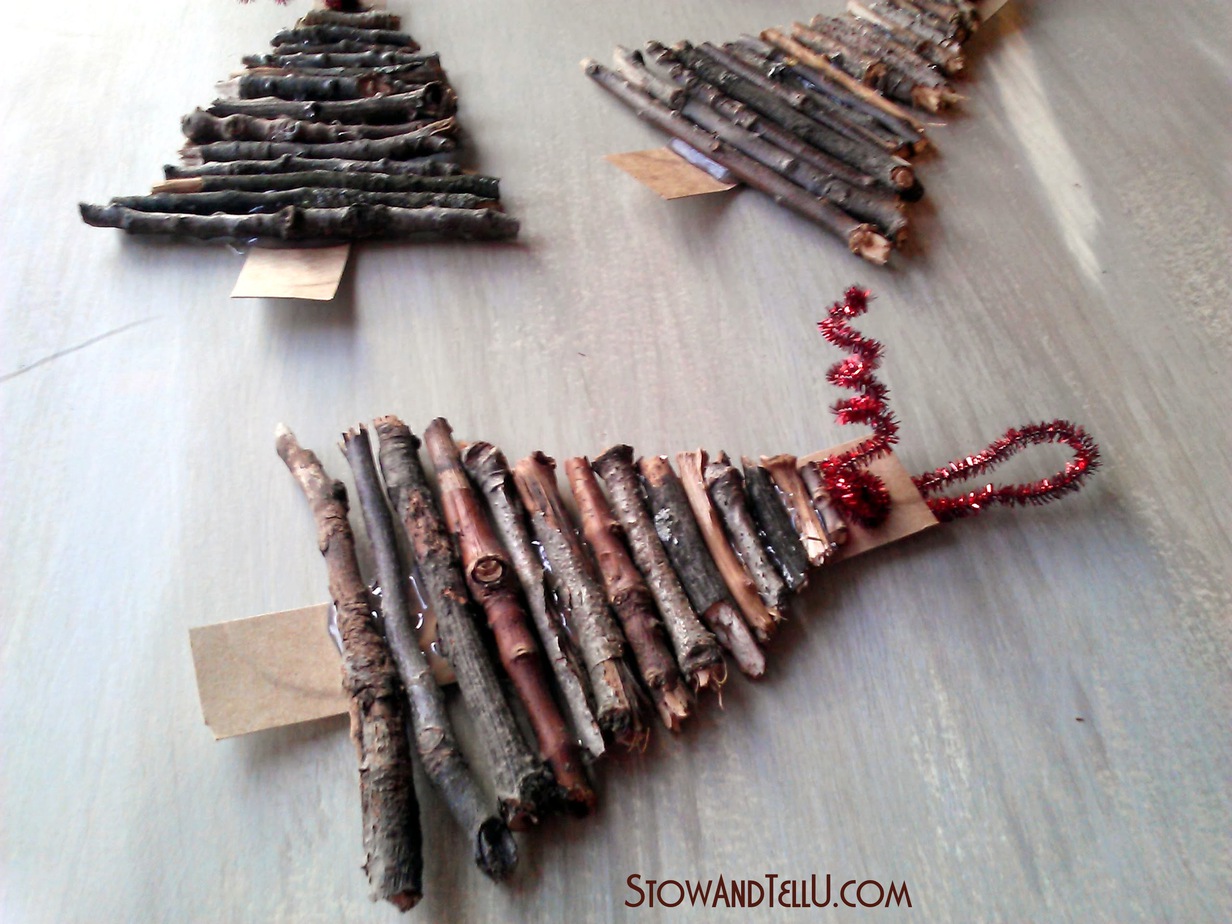 I really like the variations of color and texture on the twigs and how that all comes together into a Christmas tree. Not to mention, the cost for making these ornaments was almost free!!! I hope these ornaments get approval as the chosen ornament for this year’s Christmas gathering.
Does your family have a holiday tradition like making ornaments?
I hope you enjoyed and thank you for stopping by ~ Amy
Grab the FREE Twig Christmas Tree Ornament Making Template
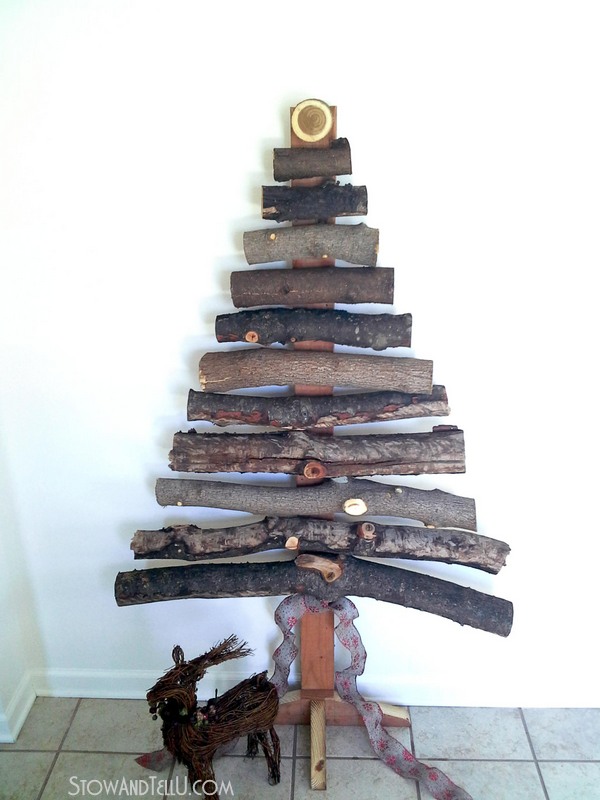
See how to make a larger version of this project: DIY Branch or Log Christmas Tree
More EASY and BUDGET FRIENDLY rustic craft ideas:
- 6 Nature Inspired Christmas Ideas that are Super Easy to Make
- Robin’s Egg Decoupaged Mason Jars
- Rustic Twig Christmas Tree LUMINARIES
- Easy Twig Valentine Heart Hot Pad Trivet
- Moss Christmas Tree Ornaments
Linking up to:
Anne says
Adorable idea Amy! So cute!
Feral Turtle says
This is so cute. I am hosting another craft party this weekend and might add this to my to do list!! Thanks for the inspiration. Cheers.
Tanya says
Amy these are really wonderful, I love bringing nature inside all year, especially in the winter-xo
heather f says
Love this. And just so you know, I totally would have made this without cooking the wood. I am sure we would have had critters crawling all over. Blech.
Mel says
That’s a beautiful tradition and I think the board made the right decision those are beautiful ornaments, great price too 😉
Bliss says
You made that look simple. But you can’t trick me, no matter how simple I know I don’t have time to make any this year.
Shanna Gilbert says
Oh Amy these are too cute! You have to link them up to Funky Junk Donna’s linky party!
casacaudill says
I absolutely love this idea! Your committee HAS to choose this idea.
Debbie @Dewdrop Gables says
These are so cute, cheap and not too difficult! Great idea when you need to make a slew of them, and I bet everyone loves them.
Saw you featured at Roadkill Rescue
Debbie 🙂
gail says
found you at beckie’s rr
Love these ornaments, so cute!
Pinning!
gail
Laura says
I love using nature for Christmas decor. This is a brilliant idea. 🙂
nafis says
beautiful
Amy says
Thank you, Nafis, for stopping by and taking the time to comment
Rose says
Amy, WOW!! What a great ideal. I am going to make some.
Amy says
Thanks, so much, Rose. I hope you have fun making them for the holidays!! Have a great weekend – Amy
Nancy @ A Joyful Cottage says
These are super cute, and I can’t believe how easy it is to make them. Made with free stuff is a plus, too. 🙂 Thank you. Consider these pinned! xxx ~ Nancy
Carissa Bonham says
I love these so much! I wanted let you know that I featured your ornament on Creative Green Living this morning!