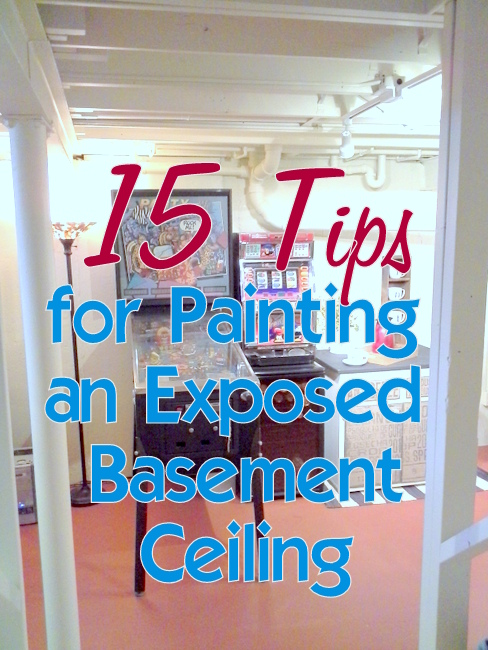
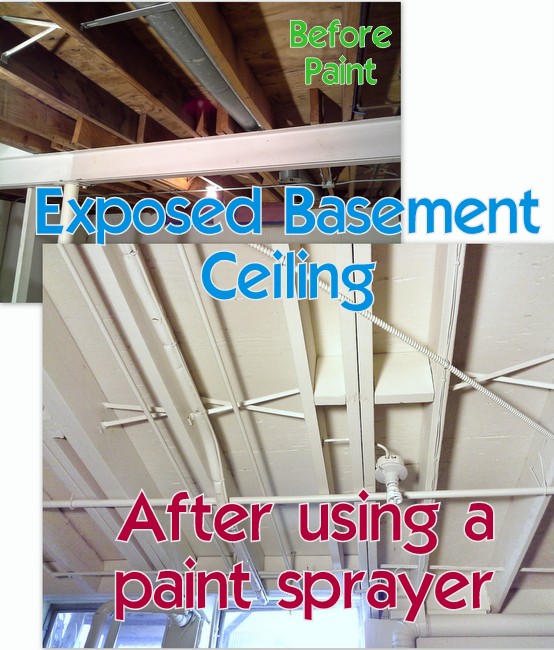
Our exposed basement ceiling has officially been painted and our basement has finally been put back together…okay, almost, but we’re working on it. The whole basement project started out over a year ago, and one of the steps that took the longest was these first 5 tips in preparation for painting an open beam ceiling.
Ken and I both agreed, as most anyone probably would, that using a paint sprayer for an open beam or exposed ceiling was in order. So I was very grateful that Homeright was willing to send me a Power-Flo Pro 2800 Airless Paint Sprayer. And although there was still a lot of work that went into preparing the basement to paint spray the ceiling, when it came time to do the actual paint spraying, the Power-Flo Pro 2800 worked very efficiently for us.
Disclaimer: Please note that some of the links below are affiliate links and I may earn a commission (at no additional cost to you) if you purchase through those links.
What kind of paint did we use?
The paint we used was the Glidden Duo, which is paint and primer combined and it worked very well with this paint sprayer.

Here is what I liked about this sprayer:
1) The machine started up right out of the box without any problems and continued to work without issue throughout the whole two-weekend sessions of the painting process.
2) The instruction manual that came in the box provided all of the information needed to assemble, start up, use, and clean the machine. As well as a list of troubleshooting tips, just in case.
3) The sprayer provided a very professional paint finish on our exposed basement ceiling that we would never have been able to accomplish with a paint roller.
Because we had large items in the basement that we could not remove, ie: a pinball machine, we decided to spray half the basement in one step, and the other half a few weekends later.
We learned quite a few things from our first session of painting the ceiling. So we were able to put those new-found tips to use in our second session. Overall I was able to boil it down to around 15 tips that I would recommend, based on our experience and what really ended up working well for us.
Here are our 15 tips for painting an exposed basement ceiling with a paint sprayer:

Prep-work. It’s all in the preparation!
The actual paint spraying part of this job, though it is still hard work and rather intensive because you are spraying upwards, against gravity, will go soooo much smoother if you spend the time beforehand prepping everything to make the paint spraying portion organized, safe, and clean.
Once again, if you are starting your exposed basement ceiling project from the very beginning, you’ll want to approach these 5 prep steps first. And then consider the remainder of the tips included in this post to keep the painting portion as easy flowing and going as possible.
Read directions and familiarize
We read the directions for the Pro 2800 paint sprayer thoroughly. And although we did not read them front to back cover, we did familiarize ourselves with the sprayer parts, the operating directions, and the cleaning directions, so that we knew what to expect.
Have an assistant
I wouldn’t say it’s a requirement to have an “assistant” to the person who will be doing the actual paint spraying, but I will say that it definitely made it easier. I was there to assist Ken with everything from cleaning his safety glasses (about 20 times) to helping him clean the machine at the end of the day.
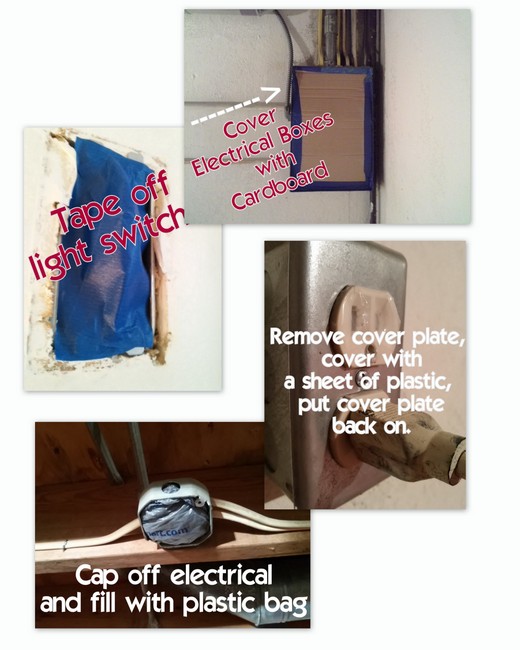
Masking off non-paint areas
No matter how far you strip down a basement for a paint spraying application, there are usually some areas that still need to be masked off. A combination of painter’s tape, plastic, and cardboard can cover a multitude of electrical or plumbing equipment.
For the outlets, Ken removed the faceplate, laid a piece of plastic over the outlet, then put the faceplate back on. This helped cover up the outlet but allowed the outer pieces to be painted. We were also able to use this outlet to plug in the paint sprayer and construction light.
This post contains affiliate links for your convenience. See full disclosure, here.
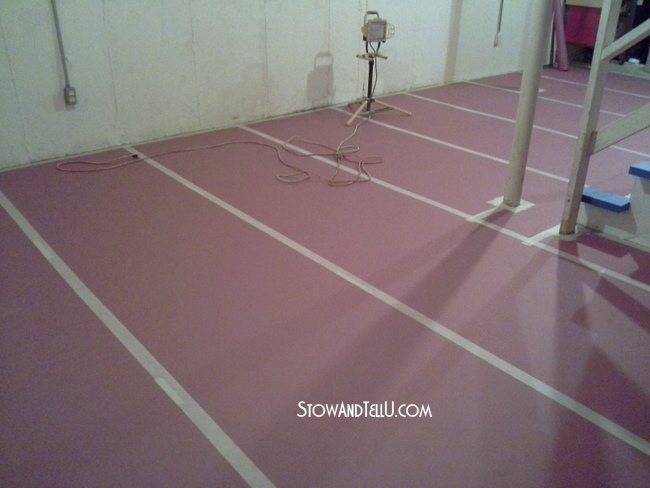
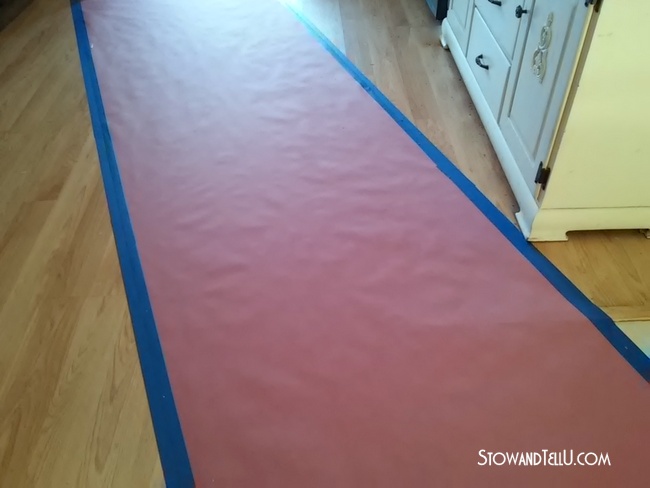
Use paper, not plastic as your drop cloth material when painting
In the first half of the basement, we used plastic tarps on the floor. This did NOT work well. The paint mist that landed on the floor made the plastic very slippery. When we prepped for painting the second half of the basement, we used a roll of masking paper, like this one).
We taped it down with masking tape rather than painter’s tape because the painter’s tape didn’t hold as well.
When the paint mist started settling on the floor, we no longer had the problem of slipping or sliding. The paper absorbed the paint mist just enough but didn’t seep through at all. It was also a very easy cleanup.
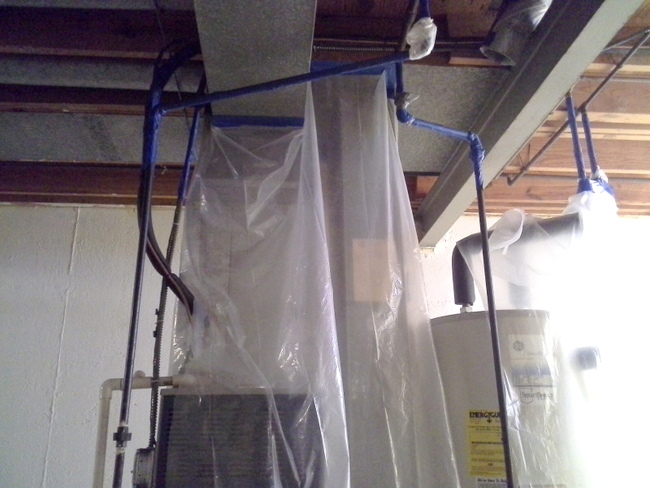
Cover and turn off furnace**
Our furnace has a switch, so we were able to turn our’s off and then cover it to protect it from painting. Ken was familiar with the safety requirements for this task, but **seeking the assistance of a professional HVAC person for this task is strongly recommended if you have any questions in this regard.**
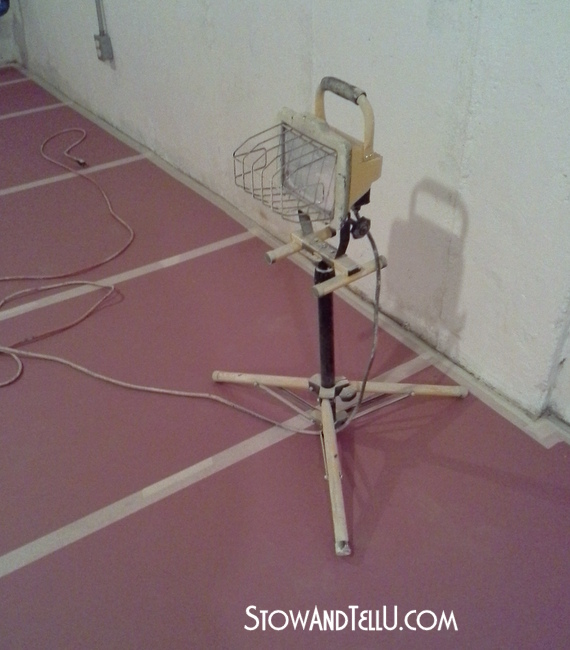
Construction light
Since many light fixtures are on the ceiling, and the ceiling is what is being sprayed with paint, having a construction-type light can come in very handy.
We used a halogen work light that was similar to this one.
At the time, LED wasn’t as popular, but I see that LED models have become more available. They also throw less heat, so that is certainly a bonus.
Our light did get covered in paint and we had to clean it several times throughout the process. Since the LED-style light does not get as hot, it is possible it could be covered with a clear film of some kind to protect it, but that is only a thought.
Do be sure to read and follow all safety directions for any lighting that you use.
The basement was pitch dark once the ceiling lights were covered and the windows were covered. The construction light was not only our only source of light, but it also provided very good lighting for the painting job.
Protect furniture and other items with tarps
We were able to move all items out of the half of the basement portion that we were painting. But although the furniture was in the other half of the basement that was tarped off, we still covered the items with plastic tarps because the fine mist can work its way over and under the divider. The paint mist wiped off easily enough, but why let it collect, if it doesn’t have to?
Wear painting gear
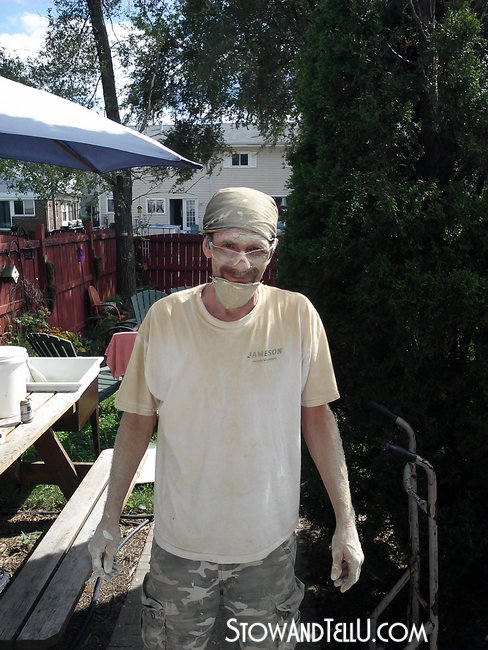
Spraying paint up into the ceiling means the overspray mist will need to go somewhere, and gravity dictates that it will go down, onto the person spraying. Thus a paint suit, safety glasses, and a good safety mask or strongly suggested. Old clothes, including long sleeves and a bandana or hat, will work in a pinch. Keeping several pairs of safety glasses and several safety masks handy to switch out with is also very strongly recommended.
Example: Ken’s safety glasses were continually getting fogged over with paint mist, so he had to keep changing out his pair of safety glasses about every 20- 30 minutes. And I had to keep cleaning his spare pairs of glasses. Because the paint was just a light mist, it did clean off the glasses rather easily with a little dish soap and a paper towel.
Cover doorway – Create a walkway
Steps like covering any doorways to other parts of the home, and laying masking paper down to create a walkway for the painter will come in very handy to keep the overspray from reaching the rest of the house. As well as allow the painter to walk outside or in other areas of the house when needing a break, (which they will most likely need, as our painting job took up most of two whole days.)
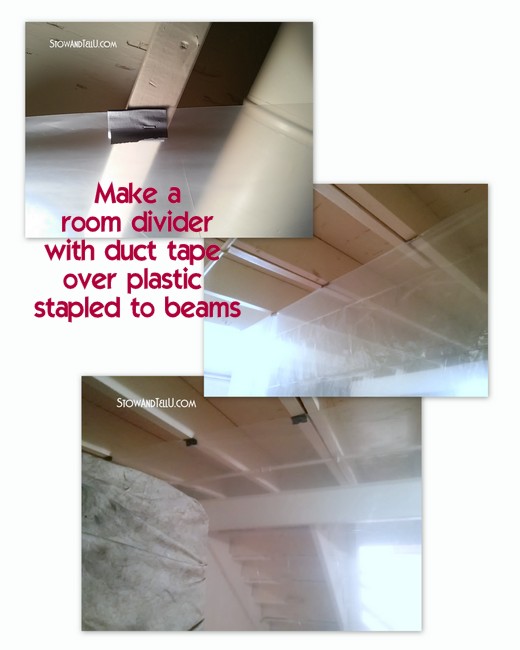
Paint half the room at a time
Because there were some items in the basement we could not remove, we painted half the basement ceiling and walls at a time. Then we rotated everything so that we could paint the other half several weeks later.
Ken used duct tape and made makeshift tabs on the end of the plastic tarping. He then stapled those duct tape tabs to the ceiling beams in order to divide the room in half for painting.

Paint ceiling and walls the same color
Although our primary goal was to paint the exposed basement ceiling, we also decided to paint the cement basement walls the same color. I highly recommend doing this for two reasons.
1) There are a lot of nooks and crannies in the meeting place between an exposed basement ceiling and the cement basement walls.
2) The extra work and cost for tarps to mask off all the walls may not be worth the savings in paint. Having said that, it is a personal design choice, but it did work out very well for us.
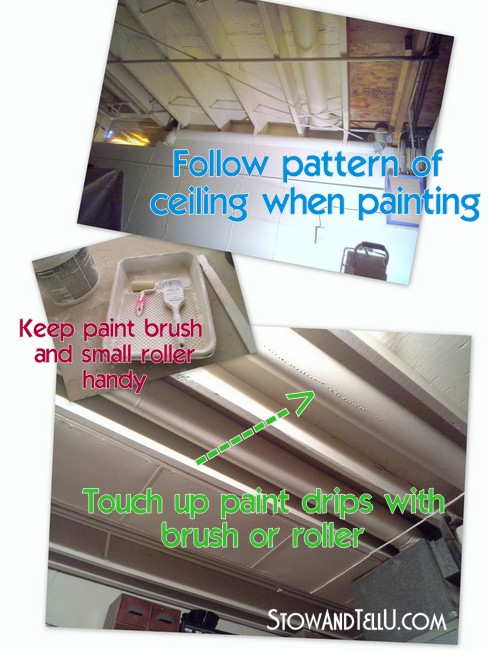
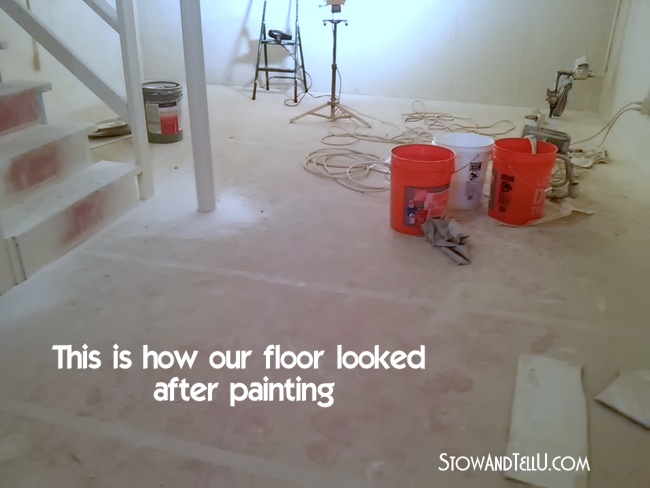
During painting
The amount of preparation for painting was a lot, but well worth it, once the paint spraying began. The main challenge during the painting process was keeping a small paint roller and paintbrush handy for any paint drips that happened. This only seemed a problem near the ductwork areas. When drips occurred, we would touch them up with the paintbrush or roller, as needed.
We purchased our paint in 5-gallon buckets and used a total of 12-14 gallons for 1500 square feet of the paintable surface. (We used Glidden Duo, which is a paint and primer combined).
Also remember to: stay hydrated, wear old clothes, and plan for a long day but a successful day of work!
Cleaning after painting
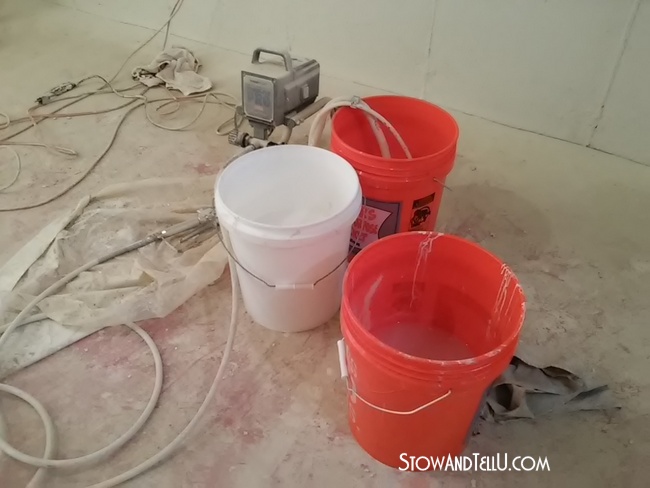
Follow the directions for cleaning the sprayer and have at least 3 clean, large buckets ready for the process of cleaning the machine. This is another time when having that 2nd person (assistant) involved will really come in handy. The cleaning process requires filling the buckets up with clean water, dumping the waste, and then refilling with water several times, as well as moving the hoses from one bucket to the other, while changing the machine’s speed and operating dials.
I was worried that we had not cleaned the machine properly, but when we started the machine up for painting the second half of the basement, (several weeks in between both painting sessions) the sprayer started right up, no problem.
Once we were finally done, we cleaned and packed away our Homeright Airless Power-Flo Pro 2800 Paint Sprayer . Without a doubt, I will be using it again for some other larger paint projects in the near future.
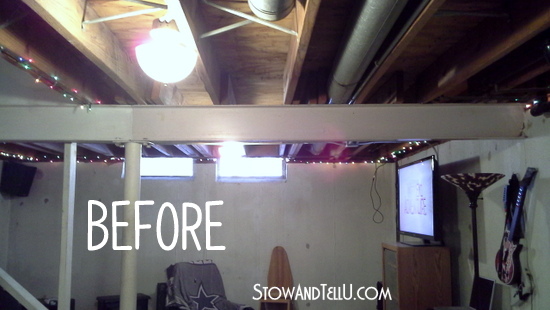
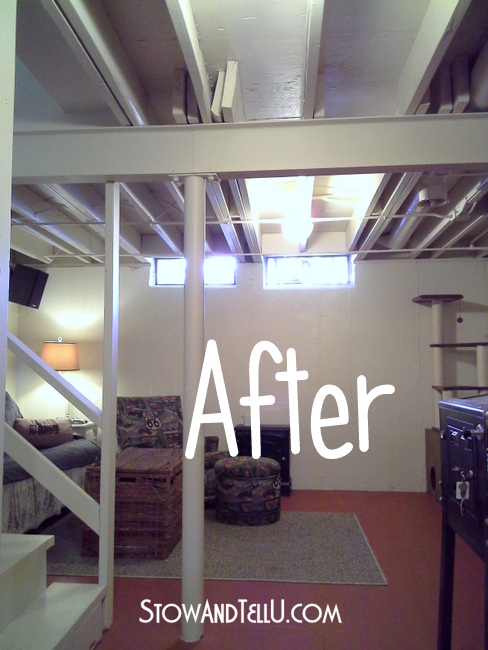
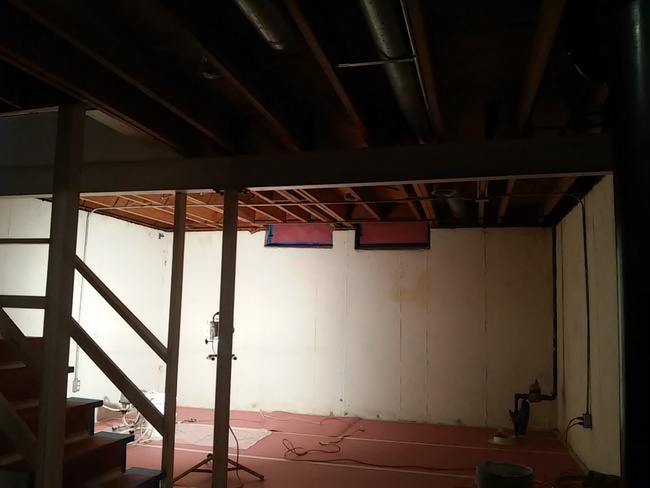
From a poorly cared for man cave to a respectable basement t.v. area
As far as the basement goes, beforehand, there were so many distractions and mismatched ceiling parts, that I got uneasy every time I went into the basement. It was a visual overload of depressing ceiling parts and pieces, blah!!

Most useful supplies
- Paint sprayer for large-area vertical and ceiling surfaces
- LED construction light

- Masking paper
- Masking tape
- Painters tape
- Plastic tarps (for covering furniture)
- Paint mask
- Safety glasses


Now that all of the ceiling parts match, and in our case the walls, too, the basement has taken on a fresh, clean and unified look. It is much more tranquil to enter the basement without all the distractions from before. It’s so much cleaner feeling. The layers of paint have actually insulated the basement and have filled in all the nooks and crannies that were virtual welcome signs to insects and spiders.
Other Recommended Paint Sprayers
- Graco Magnum ProX17 TrueAirless Sprayer
- Graco Magnum X7 True Airless Sprayer
- Titan ControlMax Airless Sprayer

Once we were done with all the painting, I was determined to continue to save money, so here are 25 ways that I found to shop my home and use what I already had to bring the decor style in the basement together.
See more Before and Afters and how much the total $$ cost for this basement update was, here.
Frequently Asked Questions (FAQ)
The best way to clean the ceiling before painting is with a shop vac. Depending on how dirty it is, you may need to clean the ceiling several times to get it as clean as possible. Don’t be discouraged by this.
An exposed basement ceiling is multi-layered and can be daunting to clean thoroughly in just one pass. You may not be able to reach some areas on the very top of the ductwork, but that should be okay. Make sure to use the brush and crevice tool attachments to get in all the nooks and crannies as best you can.
For the last step fill a bucket full of hot water and vinegar and wipe the ductwork and pipes down.
It will probably be impossible to clean the ceiling impeccably like you would a kitchen or bathroom. That is not necessary, just make sure it’s clean of all cobwebs and dust so the paint will adhere.
Latex paint works very well on an exposed wood beam basement ceiling. Optionally you can use a paint and primer mix to save time and labor. Avoid a flat or gloss finish and opt for either a satin or matte, instead.
The flat finish will attract more dust and get dirty more easily. The gloss finish may be too reflective and appear dated. Most paint brands make both satin and matte finishes that are easy to clean and have a more modern appearance.
Since an exposed basement ceiling is typically bare wood it will absorb the first coat of paint without question. You will want to apply 2-3 coats of a paint and primer combo for full coverage. If applying primer first, then painting, you may need 2 coats of primer and 2 coats of paint.
Tip: Consider having your primer tinted toward the paint color. The paint will cover the primer much faster.
What color you choose to paint the ceiling is optional but there is a basic theory. Painting a basement ceiling black, or a dark color will give the ceiling a more endless appearance, like that of a dark sky. However, black or a dark color will cause the basement area to have a darker appearance. Painting a basement ceiling white, or a light color will brighten the area; however, you won’t have that endless sky feeling.
This is a question that may be subject to your village code or ordinance, so I advise you to check the code in your area. Having said that I can tell you that we paint most of the ductwork, black pipe, copper pipe, and wires in our basement and have had no problems.
We did avoid painting any of these items near the furnace, as you can see, here, we taped it off when painting. Do avoid painting shut-off knobs or any hardware that needs to be turned on and off.
Additionally, we recommend taping off the junction boxes, electrical outlets, and the electrical box. (See the question in the comments for more details.)
We recommend that wherever you can, remove the fiberglass insulation, fill those gaps with expandable foam spray insulation, let it dry, and then trim it down with a sharp edge or razor blade. You may need to apply several coats of the insulation (repeating the steps I mentioned) to get the right coverage, and it may not look perfect, but once you paint over it, it will blend in.
No. Absolutely not. Do not use spray paint to paint your basement ceiling. For one, the fumes will be toxic, and two, you would need about 100 – 150 cans of spray paint to do the job. For that cost, you could buy a paint sprayer made specifically to handle this type of job.
Disclosure: I received free products in exchange for writing this post. All of the following tips and opinions in this post are exclusively my own. All suggestions are based on personal, not professional opinion, only. See full disclosure, here.
Post update 9/13/20
Tuula @ The Thrifty Rebel says
Wow Amy! What a big job! Your basement ceiling looks a millions times better now. It’s amazing how painting it gives it that fun industrial kinda vibe, where before it had an unfinished basement kinda vibe. It really looks fabulous!!!
Amy says
It most definitely had the unfinished basement kinda vibe, lol. Thanks Tuula xo
Sherry says
It looks really good! I couldn’t imagine painting all of that with a brush! We’re thinking about getting a sprayer. I have 6 outdoor rocking chairs that need paint. Thanks for the review!
Amy says
Sherry, one of Homeright’s paint sprayers would work great for your rocking chairs. Good luck!!
Erin says
Since you painted ductwork, did you have to use paint that was rated for high temperatures?
Amy says
Hi Erin, we did not use a painted rated for high temperatures. Our heat never goes much higher than 72 degrees (F). We haven’t seen any chipping of the paint or had any problems with the paint on the ducts. We did, however not paint the duct work directly connected to the furnace. We left that small section without paint. The paint I did use is called Glidden DUO paint and primer combined. I hope that helps.
Cheryl in Wisconsin says
That looks incredible! It went from a distraction to an architectural element that adds to the decor!
Amy says
We are really enjoying the new look and cozy feel and I’m glad to be able to still think straight whenever I’m down there now!! Thanks, Cheryl
Shanna Gilbert says
It looks so much better Amy! I have that same sprayer and I love it! My hubby has come away from projects looking just like yours lol!
Amy says
Thanks so much, Shanna, for introducing me to Homeright in the first place. Seeing some of the projects you’ve done with Homeright paint sprayers gave me the confidence to pull off this basement project!!
Feral Turtle says
What a difference Amy. I think it was so worth all of yours and hubby’s hard work. It really turned out beautiful. Looks like a fantastic paint sprayer. We were actually looking at sprayers last week and Rob said he would prefer an airless. I use the air compressor sprayer and love it but would love to try one of these babies out.
Indianabound says
Great job! I’m really impressed with the determination that you and your husband have. Such an amount of work! Besides it looking very nice it will cut down on bugs and speeds – always a good thing!
Amy says
Yes, it did take determination, as in almost a year and a half between Ken and I working full time and on different shifts and then there’s the blogging, lol. Having less bugs and spiders is definitely in my top ten list for why I’m so glad we finally did the makeover. Thanks so much for stopping by and good luck if you ever go ahead with your basement project!!-Amy
Indianabound says
I meant “spiders” of course, not “speeds.”
Marilyn says
was there any concern paint would seal/cake up screws, bolts, pipe joints, washers, etc— items that need to be worked on & adjusted in the future?
Also, where are you located? Is the basement a seasonal use room, or all the time? Obviously it’s not “finished” — but did you make other significant upgrades to turn it into a living space apart from furnishing?
Marilyn
Amy says
Hi Marilyn,
Thank you so much for stopping by. In answer to your questions:
There was concern about sealing over certain pipes, ducts, etc. I did research to find that many other people who used a paint sprayer on their basement ceiling painted over just about everything and years later, still had no regrets. What we did, however, was we tape off the furnace and hot water heater, and the pipes/ ducts that came directly off both of those units. We also taped off the Electical box and wires that fed directly out of the box to the first junction. We felt pretty comfortable that everything else would be fine with latex paint coverage.
We are located just outside of Chicago, so this is an all year basement. We also painted the floor (I am working on that post now) but between painting the ceiling and the floor the basement was so much warmer this winter. It was warmer done there than on the first level! Oh and we also put texture on the walls to give it a more “stone-ish” look. I have a post up on that on the blog.
My sister-in-law is a realtor and when she came over to see it, she said it could be listed as a finished basement. I really didnt’ do this update to get a better listing, I was just wanting the basement to be more cozy because we want to rent this townhouse and move closer to my sister.
Anyways, lol, I hope that answered your questions. It’s my favorite part of our townhouse now. If you have any others, drop me a line. Thanks and have a great weekend ~ Amy
CJ says
I AM ABOUT TO TACKLE THIS SAME PROJECT NEXT WEEKEND! I AM GOING PAINT SHOPPING THIS WEEKEND. I WAS CURIOUS AS TO WHAT PAINT YOU — USED?
Amy says
HI CJ,
I used Glidden DUO in an eggshell sheen, purchased from Home Deopt. It’s paint and primer combined into one, so we didn’t have to do any priming and the paint had very good coverage, so we only had to give everything one good coat of the paint with the paint sprayer. I hope that helps and GOOD LUCK with your basement painting project!!
Karen says
Came here from Hometalk. This is astonishing!! Doing this asap. Can I ask what color you used. It is so soft and creamy but bright and fresh. Thanks for this great post.
Amy says
Hi Karen,
Thanks so much for coming by. I used color Bavarian Cream from Behr, but, the color is not showing up the way it totally looks, lol, if you know what I mean. The lighting in the basement gives off yellos, so in photos, I’m adjusting the color to kill some of the yellow, and its showing up a little more light and creamy than it really is. So having said that, if you find a sample of Bavarian Cream, go a bit lighter and creamier than that color. Gosh I hope that helps, and good luck with painting!!! Amy
Kevin says
I am going to paint my basement ceiling very soon and in the midst of preping right now. Your post is very helpful in my prep, but the one thing I can not seem to find out information anywhere is about insulation. In between each floor joist that connect to an exterior wall has pink insulation in it to keep the heat in and cold out. Any blog that talks about painting the ceiling never talks about the insulation. Did you guys paint over any pink insulation or did you cover up that insulation or even take it out and put spray form in between the floor joists on outside walls?
Amy says
Hi Kevin,
Great question and I forgot to mention that detail, but yes, we removed the pink fuzzy fiberglass type insulation and filled those gaps with spray foam. My husband is a perfectionist so he sprayed and filled several times, trimming off the excess as neatly as possible after each layer dried, or was close to almost dry. Then he would spray more and trim some more until he was sure he had the best insulation. Use a blade to trim it down as best you can, and once it’s painted, it will blend very nicely. Doesn’t have to look perfect. He did this around the windows too. Feel free to ask more questions if you have them. I think you will love it when you’re done.
Miss Sara Anne Persons says
Question about the insulation as well are you referring to the fluffy insulation from the top of the interior blockwalls
Amy says
Hi Miss Sara,
Yes. Often the fluffy insulation will be pushed into the gaps where the wood ceiling meets the concrete wall. What we did in these areas was pull out some of the fluffy insulation and replace it with the expandable foam insulation. We filled the gaps with the foam insulation, allowed it to expand fully, and then we trimmed off the excess with a sharp edge. The foam edge may not look perfect, but once you have sprayed paint over this area you will have a much cleaner look than if you had just left the fluffy insulation. I hope this helps, but let me know if you have any more questions. Thank you for your question ~ Amy
traggs says
This post is going to be GREAT for helping me get started on my basement/bar area. One problem I anticipate is above and around the pipes. The angle seems as though it would not be spray-able. Is it hard to get coverage up there? I can see my self trying to spray from too many angles and then having the paint cake up, drip, and not cover the nooks and crannies. How did you tackle this aspect?
Amy says
Hi Traggs,
Thank you for your question. Regarding spraying around/on top of the pipes, here are a few tips will hopefully help. The first one is that if your paint sprayer has an adjustable nozzle, try to turn it down to a lower stream. Secondly, if you have a couple of larger pieces of card board handy, try holding a piece of the card board in front of the pipe area while you try to spray the ceiling parts above the piping, then once you’re satisfied with the ceiling coverage, go back over it with out the card board covering the piping. Lastly, keep a tray with a paint brush and small roller nearby because there will still mostly like be some dripping and the brush and or roller can help you to soak some of that excess paint up.
I hope these answer your question, but please feel free to ask any other questions you may have. We were so pleased with ours and really hope that this post helps anyone who is trying to fix up their basement, too. Regards ~ Amy
LA says
Hi Amy! First off, thanks for the detailed instructions and helpful tips. Your basement looks so welcoming now! I have a question about prep, which I didn’t see mentioned in your previous post. Given that most basements are a bit dusty and sometimes cobwebby, how did you tackle cleaning the ceiling before the rest of your painting prep? Does it need to be absolutely spotless before painting begins, or is the sprayer forgiving of a little residual dust on wood beams? It can be tough to get rough wood entirely clean.
Amy says
Hi LA,
That’s a GREAT question, and I probably should update both posts with some details on how we cleaned the ceiling in preparation for painting, because we did have to give the ceiling several thorough cleanings before we painted. Thank you for asking this question.
To clean the ceiling we used a good shop vacuum and several vacuum attachments and basically vacuumed into every hole, crevice and corner, along all the beams, and then along all the flat ceiling surfaces. We used the brush attachment to get above the duct work as best we could, and then used hot water and a vinegar solution (a gentle solution will work too) with rags to wipe down the tops of the duct work as best we could. There was a lot of dust and debris along the area where the ceiling meets the walls, so we made sure to go over that several times. If I remember correctly, we probably went over all surfaces about 3 times thoroughly.
As we were decluttering the basement in the prior months, I was cleaning the ceiling with the vacuum, which made the final 3 cleanings a lot easier. I would say there was still a few cob webs and several areas on top of the duct work that we just couldn’t reach. The paint took to all of those places fine and we just had to accept that in those places we were painting over some dirt. But with the thorough cleaning that we did, there wasn’t many areas that were an issue. We used a paint/ primer combination and all in all, I didn’t see any areas that did’t take to the paint. I hoped this helps. Once again, thank you for taking the time to ask this question, and please don’t hesitate to ask any others. Good luck with your basement project!! ~ Amy
Judy Gaaskjolen says
You said you used Glidden Duo paint. You also mentioned the color Bavarian Cream from Behr. Did you have the Glidden paint mixed using the color formula from Behr color samples? Why did’nt you use Behr paint? I prefer Behr paint over Glidden.
Amy says
Hi Judy,
You are right, I used the Glidden Duo mixedto the Behr color Bavarian Cream. We went with the Glidden over Behr because they were having a big sale on the Glidden paint. Like you, I really like Behr, but we were trying to save wherever we could. The Glidden Duo worked out great, though I’m sure the Behr would have too. I apologize for forgetting to mention that detail. Thanks and let me know if you have any other questions -Amy
Carl in Chicago says
Wow, it really does make a difference. What do you think about using black paint instead? People say that it makes the basement ceiling look taller?
Amy says
I think black paint could be just as striking in the right setting. I’m no expert, but I’ve seen exposed ceilings in restaurants painted black and it does seem to make the ceiling go on and on. Thanks for stopping by, Carl!
Macey says
Any advice on what to do if your ceiling has foil radiant barriers? Should I just get rid of them and replace with spray foam insulation? Because I’m assuming that painting the foil wouldn’t be a good idea…?
Amy says
Can I ask a bit more information? Is it radiant foil rolls with the fiberglass backing? Is this for a basement or somewhere like an attic or garage? And is there a lot of it, or just a few areas with the radiant foil. To my knowledge you really wouldn’t paint over the radiant foil. Something you might do, is cover the foil with either drywall, bead board, or paneling, and then paint that.
If the room is in the attic, or garage, then the foil is obviously helping to insulate. If it the basement, on the ceiling of the basement, and there is another level of your home above the basement ceiling, then you might not need the foil insulation in that area because it’s not directly exposed to the outdoors.
If you can tell me more about your project and maybe a photo, I’d be glad to help you figure out some ideas for what your options are.
Looking forward to hearing back from,
Amy
Jared says
Hi Amy, we are getting ready to paint our ceiling in the basement. I had a question regarding the electrical work. We have junction boxes that have covers on them. The wire is stapled to the joists as well. Is it safe to paint over these or should they be covered up?
Thanks for your help, Jared
Amy says
HI Jared,
If your junction boxes are covered with the solid metal plate that usually goes over the box, then it is okay to paint it, as is.
If your junction boxes are ceiling outlets, and there are wires inside the box, you want to cap off the wires and then stuff a plastic bag inside the box, like in the picture. MAKE SURE POWER IS TURNED OFF BEFORE DOING THIS.
If it is an electrical outlet, remove the outlet cover, lay a piece of plastic over the outlets, and then put the cover back on. ***Make sure the electrical power is turned OFF when doing any of this, as well.
Let me know if this answers your question, or if you still have more. We’d be glad to answer them.
Good Luck. I think you are going to love it when you are done!!
Amy
Jared says
Thank you, that was exactly what we were trying to figure out. We have the same paint sprayer as you, so thanks for the help there!
Pat Manchester says
This ia exactly what I want to do with my basement ceiling. I don’t need to do the walls, etc, because I am just looking for it to be not spooky in the laundry and on my way the the finished part of the basement. BUT what is an electrician going to say about all his wiring being painted over? Isn’t that a problem? I know the panel and wires coming right out of it are left unpainted. but as 64 years of wiring zigs and zags across my ceiling, I wonder if it will make this harder and I will be cured forever.
Amy says
Hi Pat,
We did paint over our wiring and have not had any problems. It has been 4 years and we’ve had 2 renters in the home and (knock on wood) all has been fine. BUT… I do understand your concern, especially with your wiring zigzagging all over the place. We had that going on too, and Ken took the time to re-run most of the wiring. And we had a variety of wiring going on down there. Ken did it himself, so we had the cost of some new wiring and such, but since he did it the labor was free.
One idea would be to hire your electrician to clean up or re-run some of the wiring, and secure it to the exposed ceiling. Then you might feel more comfortable painting the ceiling and painting over the wiring.
Another idea might be adding a drop ceiling, plank ceiling or bead board ceiling. I myself love the bead board ceiling look, especially in basements. It’s fairly cost effective. I don’t think it’s too hard to install, and you could paint it (one method is to paint it before you mount it to the ceiling, then you can touch it up once it’s installed.)
I hope these are helpful suggestions. Please let me know if you have any other questions.
Sincerely,
Amy
Stow and Tell U
Dave Kerr says
Hi Amy,
You mentioned cleaning the ducts with vinegar/water, but did you do any prep for PVC, copper piping, rigid conduit, or gas piping? I have all this in my ceiling and want to be sure I avoid paint cracking issues. Also, after the ceiling is done, I’m going to roll primer + 2 coats of light gray paint on the walls (drywall already up). Since I’m using black, flat paint on the ceiling, do you think I still need to cover the walls from over-spray? Thanks for your help…yours was by far the best post I’ve seen while researching this project. Dave K
Amy says
Hi Dave,
So sorry I wasn’t clear on the cleaning part, and I have yes/no answer for you in response, (bare with me).
Yes, we cleaned every pipe, duct, and conduit surface that we had access to. Some of the areas were really had to reach because they were either flush with the ceiling surface, attached to the wall, or out of reach in some other way.
But no, I didn’t use vinegar and water on surfaces like the exposed wiring, What I could recommend for those area would be something like the clorox wipes, windex or more of an alcohol based cleaner so you aren’t exposing wires to water. If you are cleaning anywhere near electric sockets, turn off the electrical breaker to those areas. Also consider using a swifter duster type utensil to get to into the nooks and crannies, and on the tops of the different kinds of “piping”.
I’ll also add that I cleaned all areas of the basement with the shopvac 3-4 times.
Regarding the question on whether or not you should tape off the walls because they are going to be a gray color vs the ceiling which will be painted black: Both Ken and I would say: Yes, tape off the walls. While it is more prep, and will cost a little more time and money (in tape and plastic tarp), you will avoid having to use a bunch more primer, paint and wax-on-wax-off time (lol), trying to cover over the black paint over spray.
Not to say the primer and paint wouldn’t eventually cover the black, the question would be: Which do you think will take you more time, effort, cost?: To tarp/ tape off the walls – or – To have to paint several extra coats of primer on all the walls to cover the black over spray?
Finally, I’m not sure if you were asking about what Ken did to prep all the wiring, or how did we clean the wiring, or something else, but it sounded like you were asking about how we cleaned the wiring and other piping, so that is how I responded.
I hope these answers get you farther along. I’m so glad to hear that our post helping you get your basement done.
Don’t hesitate to ask more questions, we’ll be more than glad to help.
Best of luck to you on your basement project.
Sincerely,
Amy
Kristy KEpp says
Thank you for the information. As I was reading through the comments, someone asked about high temp paint. We are planning to paint our ceiling and have hot water heat and I didn’t think about the temperature of the copper piping. Any advice?
Thanks!
Amy says
Hi Kristy,
We also have hot water running through our copper piping (from our hot water heater). We used a standard primer/paint combined that was not “high temp paint,” and I can tell you that we’ve had no problems with getting hot water to our faucets, or our gas bill going up, or any other issue that concerned us. The only thing we’ve noticed on some of the piping (and it think it was the conduit for the electrical wires) was that some rust that was already on the piping bled through the paint. It is not severe and if we choose, we could touch it up with more paint, but it hasn’t really been an issue. I hope that answers your question, but if not, or if you have more, don’t hesitate to ask. Thanks so much, and good luck with your basement project!! Amy
Matthew says
Hi, I had a quick question. I plan to do something similar with my basement soon but also need to drylok the concrete walls. would you suggest painting the ceiling first or applying the drylok on the walls first?
Amy says
Hi Matthew,
While it could probably be done either way, my thought would be to do the drylok on the walls first to make sure the concrete is sealed with the right product first, so that if any of the paint from the ceiling sprays over onto the walls, the walls are already protected by the drylok. Let me know if you have any other questions.
Best of luck. Amy
Stephanie says
Hi! J just bought a house and want to do the ceiling with the open concept and spray painted … someone is telling me eventually it will drip off onto the floor when the pipes get hot? I’m trying to find out if this is true. Have you had any of those issues?
Amy says
Hi Stephanie,
Thanks for your question. The answer is no. The paint will not drip off when the pipes get hot. But do know that the paint may drip some during the application. That is why you want to cover the floor while you are actually painting the ceiling as we suggest in this post. However once the paint has dried, it will not drip.
I hope that helps. Good luck if you go for it.
Amy
Dave Amati says
Excellent article and helped me a lot especially with the yellow soft foam on the front and the back of the house, you mentioned using a spray foam and never thought of that. I am wondering if I should use a one inch rigid foam to cover some areas that has a ugly wires showing ???
Amy says
Hi Dave,
You can use rigid foam to cover the wires if you want. We did not do that, but Ken did tidy up the wires and adhere them to the ceiling beams with wire staples which you can find at most hardware/department stores. Then we just painted right over the wires. Once they are painted, they blend in quite well. I can’t be 100% on how the paint will adhere to the foam, so you might want to test that. It is a matter of choice, though, in my opinion. So if you think it will create a cleaner appearance, go for it.
I hope that helps. Good luck!!
Amy
Jen says
Hello,
We are getting ready to paint our basement ceiling. We’re you concerned, or did you have an issue with paint going upstairs through any gaps or around the vents?
Amy says
Hi Jen,
We didn’t have an issue with paint going up through the cracks in the vents. But what I could suggest if you are concerned is you can remove the vents upstairs and apply painters tape around the cracks before you spray the ceiling.
I hope that helps and good luck with your project!!